


I was lucky enough to attend to EuroBSDCon 2023 and offered the
opportunity to talk about one of my favorite OpenBSD stock daemon:
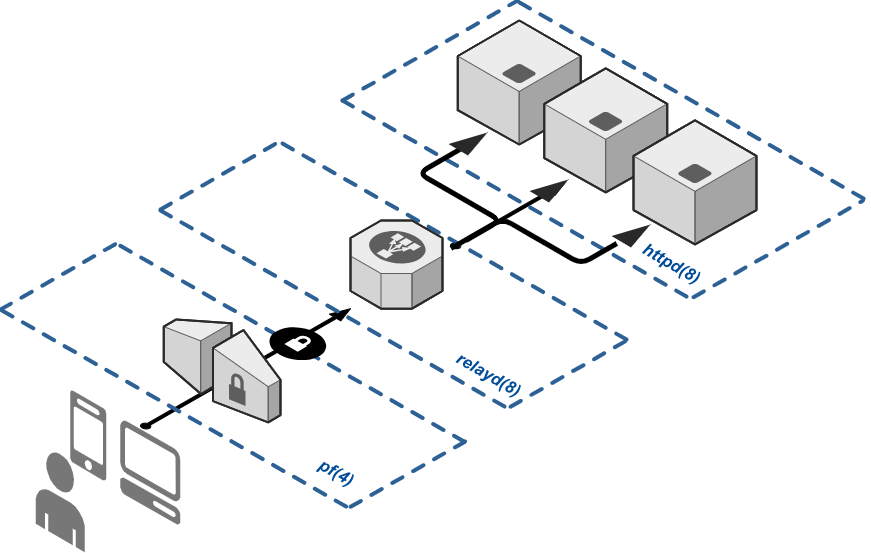
relayd(8).
The talk was recorded and made available on the EuroBSDCon YouTube
channel.
. One may check
the EuroBSDCon 2023 program
for more material.
This post attempts a reboot of the slides content in a more
browser-friendly format.
- Multi-purpose daemon available on OpenBSD since 4.3*:
- load-balancer.
- application layer gateway.
- transparent proxy.
- Capable of monitoring groups of hosts for high-availability.
- Operates as:
- Layer 3 redirection via communication with pf(4).
- Layer 7 relaying with application level filtering via itself.
* relayd was known as hoststated in OpenBSD 4.1.
The man pages are a must read before proceeding further.
# man relayd
# man relayd.conf
# man relayctl
The configuration file is expected in the standard etc directory. An
example is available if you need more inspiration.
# more /etc/examples/relayd.conf
# vi /etc/relayd.conf
One can check for configuration errors using:
# relayd -dvn
The service is enabled and started using the standard rcctl utility:
# rcctl enable relayd
# rcctl start relayd
# rcctl stop relayd
A dedicated command can be used to get more information about relayd(8)
state and apply specific actions:
# relayctl 𝘤𝘰𝘮𝘮𝘢𝘯𝘥 [𝘢𝘳𝘨𝘶𝘮𝘦𝘯𝘵 ...]
More on this later on.
-
Macros: user-defined variables that can be used later on.
-
Tables: host or a group of hosts defining traffic targets.
-
Protocols: settings and filter rules for relays.
-
Relays: layer 7 proxying instances.
This is the simplest HTTP Reverse proxy configuration that you can get:
http protocol www {
    pass
}

relay www {
    listen on 203.0.113.1 port 80
    protocol www
    forward to 192.0.2.10 port 80
}
The first section defines an HTTP PROTOCOL object. Name has been set to
‘www’ but it can be anything.
The RELAY section defines a listening address and port. It links the
relay to the previously configured protocol. It defines the backend
server that will receive the HTTP requests.
This example expands the previous HTTP Reverse proxy configuration with
usage of reusable variables (MACROS) and logging of state changes and
remote connections.
# Macros -----------------------------------
ext_addr="203.0.113.1"
webhost1="192.0.2.10"

# Global configuration ---------------------
log state changes
log connection

# Tables -----------------------------------
table  { $webhost1 }

# Protocols & Relays -----------------------
http protocol www {
    pass
}

relay www {
    listen on $ext_addr port 80
    protocol www

    forward to  port 80
}
Previous examples are using plain text HTTP. Switching to HTTPS provides
secure communication and data transfer between the client and the
website.
You’ll need to acquire a TLS certificate. That steps is beyong the scope
of this post. But have a look at acme-client(1) and httpd(8) manpages.
Those will guide you through the process of getting an HTTPS certificate.
Once acquired, install the certificate under /etc/ssl. If you used
acme-client(1), you should get files such as:
/etc/ssl/private/relayd.example.key
/etc/ssl/relayd.example.crt
Reference the certificate name in the protocol section. Then replace the
listen directive of the relay section to specify the usage of tls.
# Macros -----------------------------------
ext_addr="203.0.113.1"
webhost1="192.0.2.10"

# Global configuration ---------------------
log state changes
log connection

# Tables -----------------------------------
table  { $webhost1 }

# Protocols & Relays -----------------------
http protocol wwwtls {
    tls keypair relayd.example
}

relay wwwtls {
    listen on $ext_addr port 443 tls
    protocol wwwtls

    forward to  port 80
}
Renaming the protocol and relay names is not mandatory. I only did it to
make it clear what I’m doing.
relayd(8) allows to distribute incoming requests to several backend
servers. Depending on its configuration, you can balance the load on
those servers and/or keep the service up and running since you only
encounted n-1 failure(s).
ext_addr="203.0.113.1"
whost1="192.0.2.11"
whost2="192.0.2.12"
whost3="192.0.2.13"
interval 5
table  { $whost1, $whost2, $whost3 }

http protocol wwwtls {
   tls keypair relayd.example
}

relay wwwtls {
    listen on $ext_addr port 443 tls
    protocol wwwtls
    # l/b using source-IP, check HTTP return code
    forward to  port 80
      mode loadbalance
      check "/health-check" code 200
}
In this example, a TABLE has been created that references all the backend
servers – those that will receive the HTTP requests.
There are many scheduling algorithms (aka MODE) available. Check the man
page for more details. The default is using roundrobin and no health
checks. Here, we’re using the loadbalance algorythm and return code check.
There are cases when you want to implement automatic reaction on
server(s) outage events. You may want to switch the whole service to a
secondary server pool. You may display an incident status page
rather that an HTTP/500 error page. You should probably display a static
“be back soon” page while performing maintenance.
This is what the fallback feature can be used for.
ext_addr="203.0.113.1"
whost1="192.0.2.11"
whost2="192.0.2.12"
whost3="192.0.2.13"
interval 5
table  { $whost1, $whost2 }
table  { $whost3 }

http protocol wwwtls {
   tls keypair relayd.example
}

relay wwwtls {
  listen on $ext_addr port 443 tls
  protocol wwwtls

  # l/b using round-robin, check HTTP return code
  forward to  port 80 mode roundrobin
    check http "/" code 200
  # switch service if all previous checks fail
  forward to  port 80
}
Two TABLEs have been defined. One for the primary server(s). One for the
fallback server(s). Then, everything happens in the relay section. The
first forward directive load-balances the HTTP requests to the primary
servers pool. The second forward directive acts as the fallback target.
It will be triggered as soon as no servers from the primary pool are
known to be working.
In a use-case where you pr