


At DockerCon 2023, we announced our intention to use OpenPubkey, a project jointly developed by BastionZero and Docker and recently open-sourced and donated to the Linux Foundation, as part of our signing solution for Docker Official Images (DOI). We provided a detailed description of our signing approach in the DockerCon talk “Building the Software Supply Chain on Docker Official Images.”
In this post, we walk you through the updated DOI signing strategy. We start with how basic container image signing works and gradually build up to what is currently a common image signing flow, which involves public/private key pairs, certificate authorities, the Update Framework (TUF), timestamp logs, transparency logs, and identity verification using Open ID Connect.
After describing these mechanics, we show how OpenPubkey, with a few recent enhancements included, can be leveraged to smooth the flow and decrease the number of third-party entities the verifier is required to trust.
Hopefully, this incremental narrative will be useful to those new to software artifact signing and those just looking for how this proposal differs from current approaches. As always, Docker is committed to improving the developer experience, increasing the time developers spend on adding value, and decreasing the amount of time they spend on toil.
The approach described in this post aims to allow Docker users to improve the security of their software supply chain by making it easier to verify the integrity and origin of the DOI images they use every day.
Signing container images
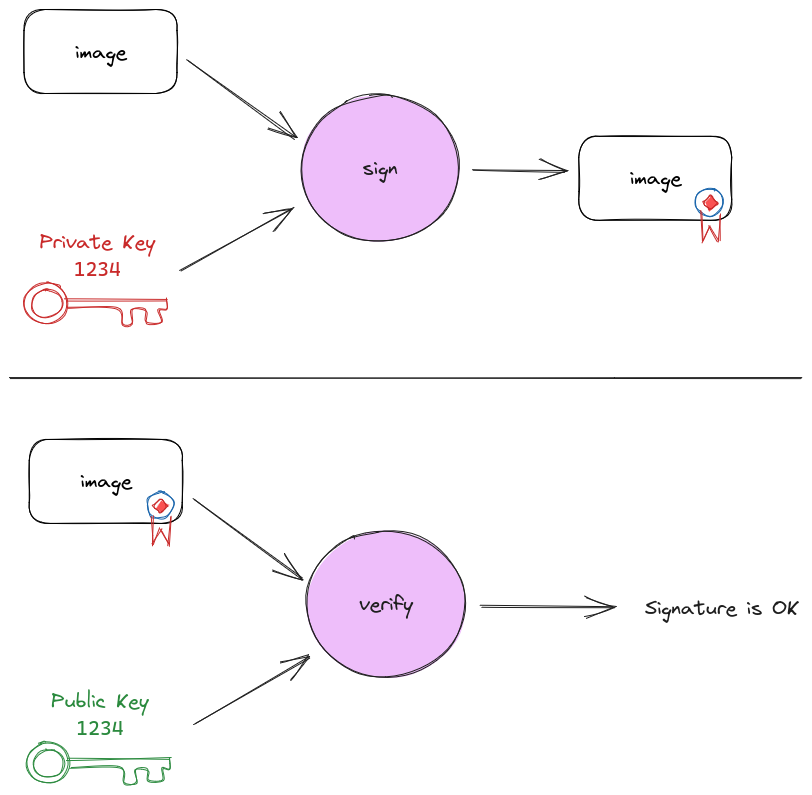
An entity can prove that it built a container image by creating a digital signature and adding it to the image. This process is called signing. To sign an image, the entity can create a public/private key pair. The private key must be kept secret, and the public key can be shared publicly.
When an image is signed, a signature is produced using the private key and the digest of the image. Anyone with the public key can then validate that the signature was created by someone who has the private key (Figure 1).
Let’s walk through how container images can be signed, starting with a naive approach, building up to the current status quo in image signing, and ending with Docker’s proposed solution. We’ll use signing Docker Official Images (DOI) as part of the DOI build process as our example since that is the use case for which this solution has been designed.
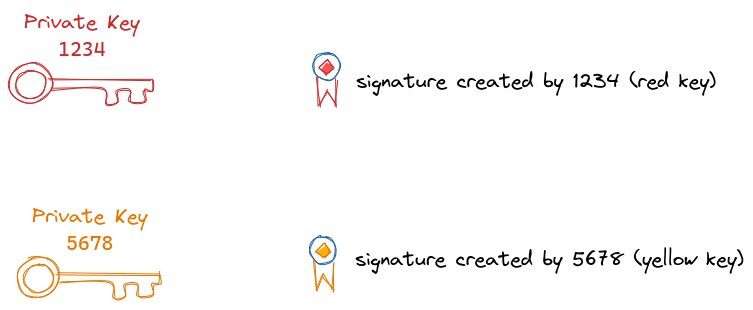
In the diagrams throughout this post, we’ll use colored seals to represent signatures. The color of the seal matches the color of the private key it was signed with (Figure 2).
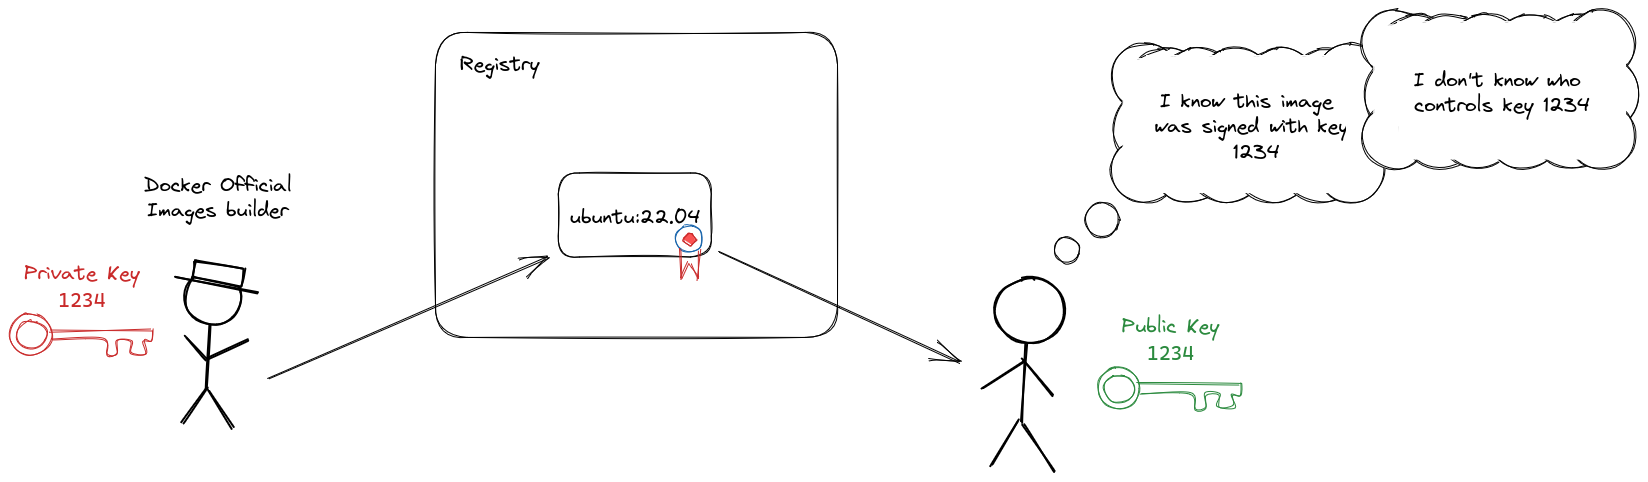
Note that all the verifier knows after verifying an image signature with a public key is that the image was signed with the private key associated with the public key. To trust the image, the verifier must verify the signature and the identity of the key pair owner (Figure 3).
Identity and certificates
How do you verify the owner of a public/private key pair? That is the purpose of a certificate, a simple data structure including a public key and a name. The certificate binds the name, known as the subject, to the public key. This data structure is normally signed by a Certificate Authority (CA), known as the issuer of the certificate.
Certificates can be distributed alongside signatures that were made with the corresponding key. This means that consumers of images don’t need to verify the owner of every public key used to sign any image. They can instead rely on a much smaller set of CA certificates. This is analogous to the way web browsers have a set of a few dozen root CA certificates to establish trust with a myriad of websites using HTTPS.
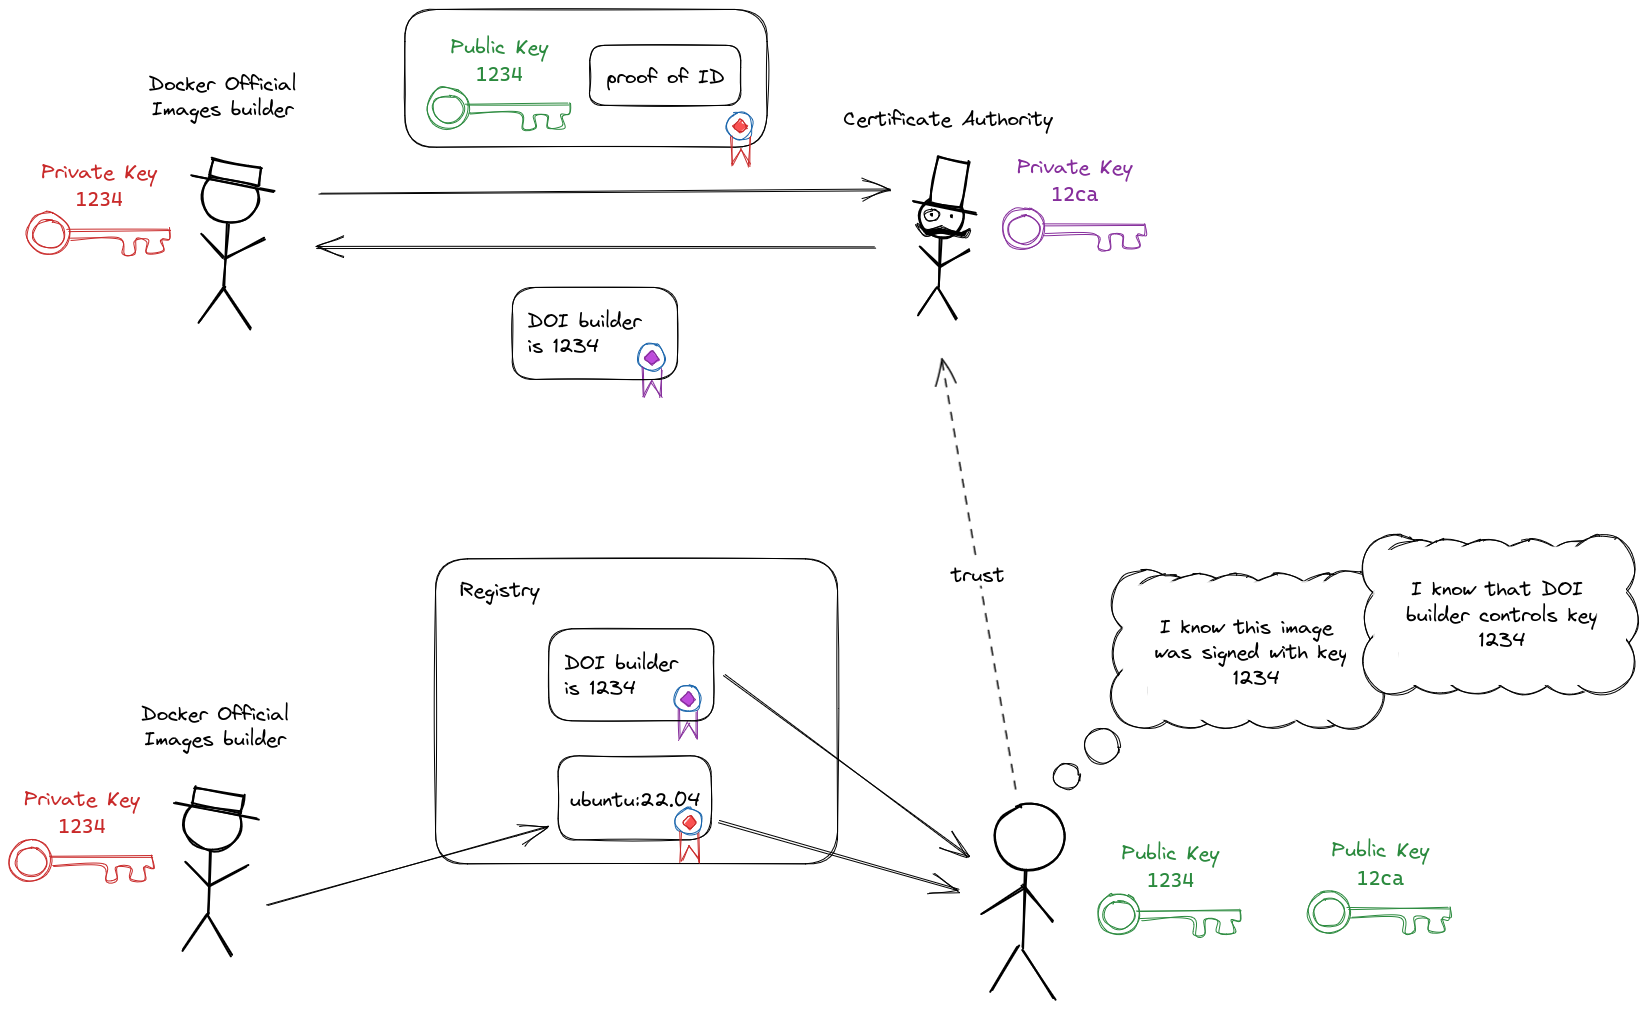
Going back to the example of DOI signing, if we distribute a certificate binding the 1234 public key with the Docker Official Images (DOI) builder name, anybody can verify that an image signed by the 1234 private key was signed by the DOI builder, as long as they trust the CA that issued the certificate (Figure 4).
Trust policy
Certificates solve the problem of which public keys belong to which entities, but how do we know which entity was supposed to sign an image? For this, we need trust policy, some signed metadata detailing which entities are allowed to sign an image. For Docker Official Images, trust policy will state that our DOI build servers must sign the images.
We need to ensure that trust policy is updated in a secure way, because if a malicious party can change a policy, then they can trick clients into believing the malicious party’s keys are allowed to sign images they otherwise should not be allowed to sign. To ensure secure trust policy updates, we will use The Update Framework (TUF) (specification), a mechanism for securely distributing updates to arbitrary files.
A TUF repository uses a hierarchy of keys to sign manifests of files in a repository. File indexes, called manifests, are signed with keys that are kept online to enable automation, and the online signing keys are signed with offline root keys. This enables the repository to be recovered in case of online key compromise.
A client that wants to download an update to a file in a TUF repository must first retrieve the latest copy of the signed manifests and make sure the signatures on the manifests are verified. Then they can retrieve the actual files.
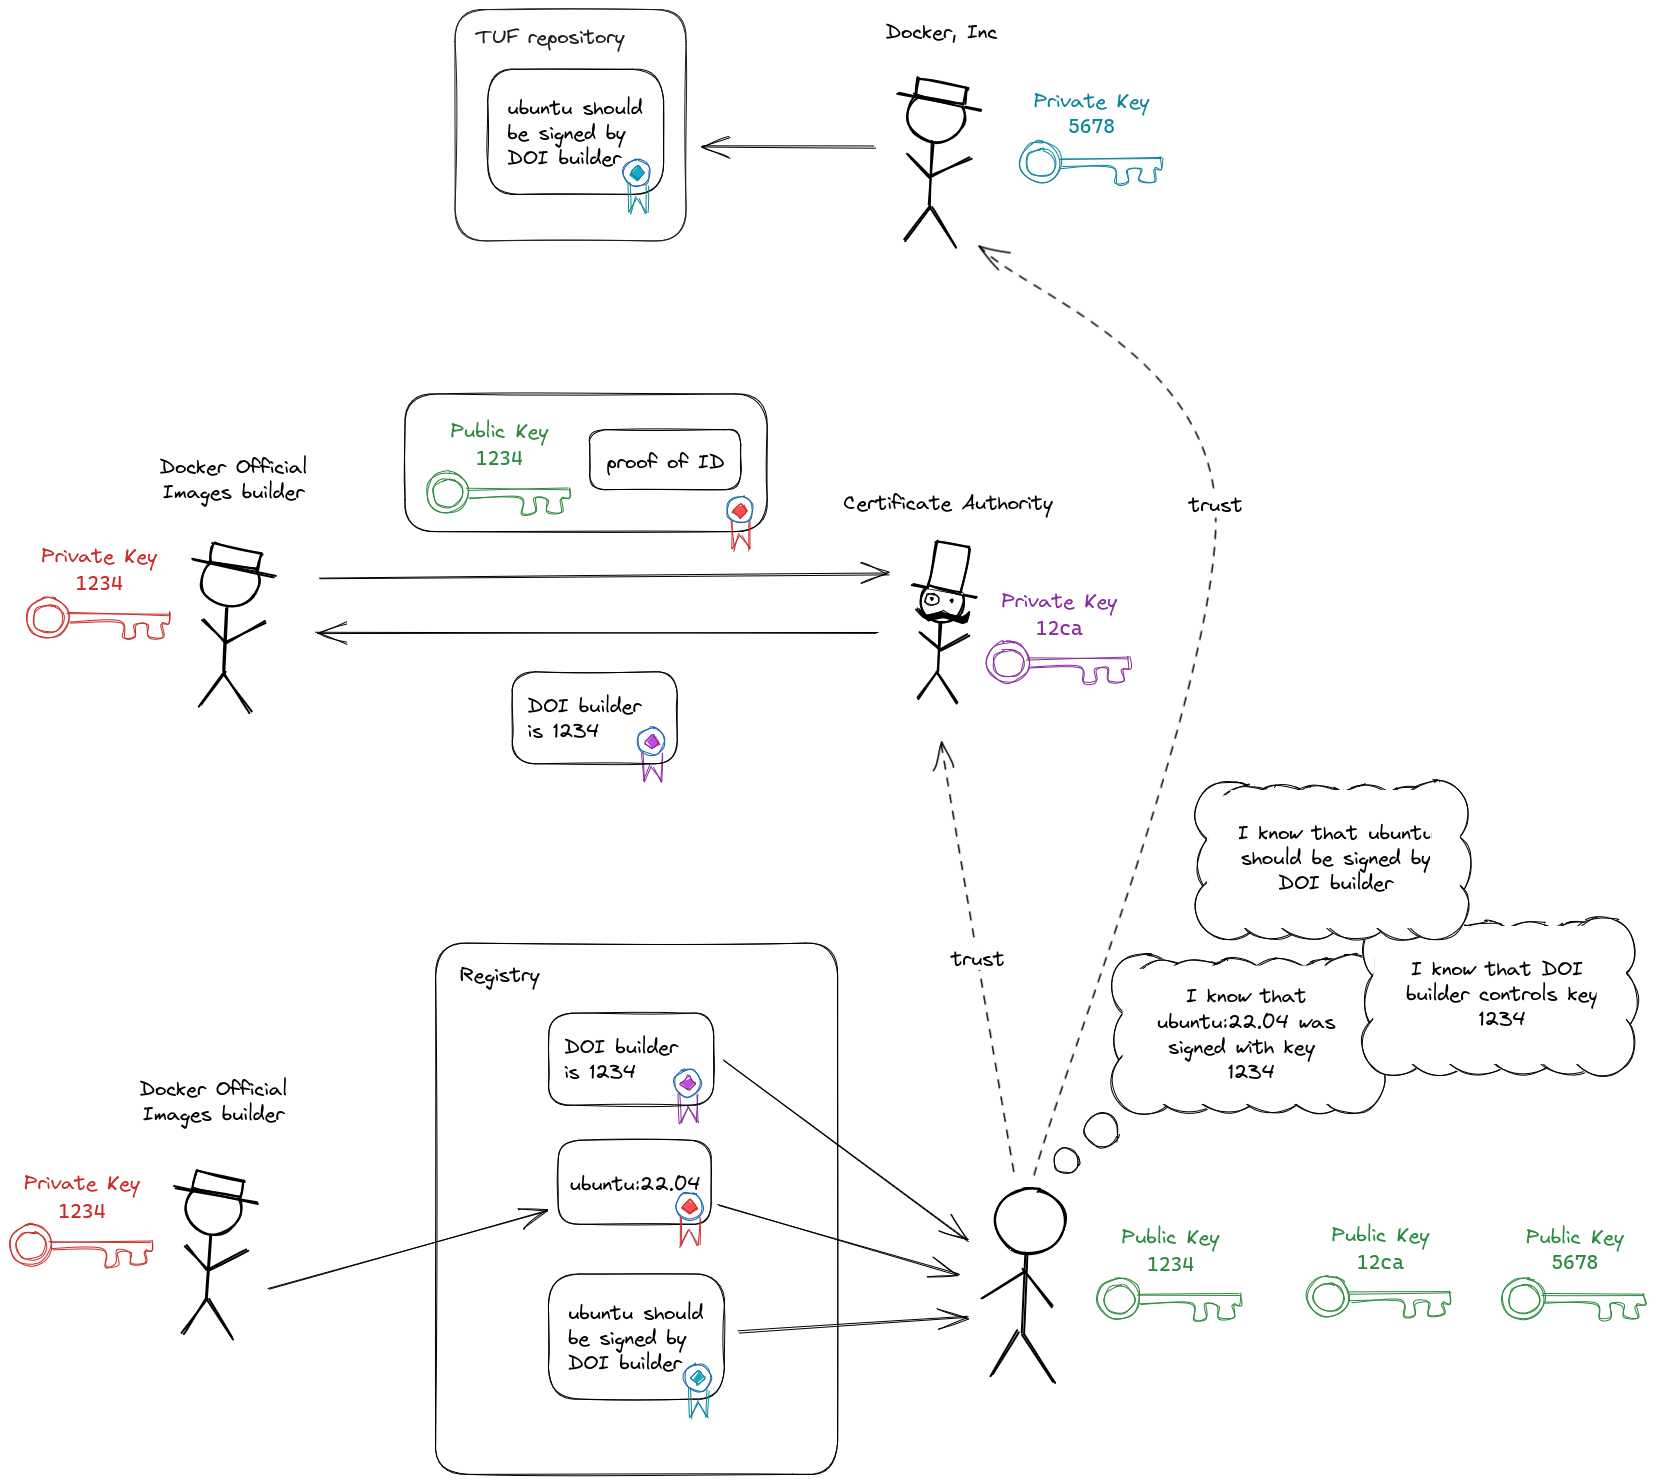
Once a TUF repository has been created, it can be distributed by any means we choose, even if the distribution mechanism is not trusted. We will distribute it using the Docker Hub registry (Figure 5).
Certificate expiry and timestamping
In the preceding section, we described a certificate as simply a binding from an identity to a public key. In reality, certificates do contain some additional data. One important detail is the expiry time. Usually, certificates should not be trusted after their expiry time. Signatures on images (as in Figure 5) will only be valid until the attached certificate’s expiry time. A limited life span for a signature isn’t desirable because we want images to be long-lasting (longer-lasting than a certificate).
This problem can be solved by using a Timestamp Authority (TSA). A TSA will receive some data, bundle the data with the current time, and sign the bundle before returning it. Using a TSA allows anybody who trusts the TSA to verify that the data existed at the bundled time.
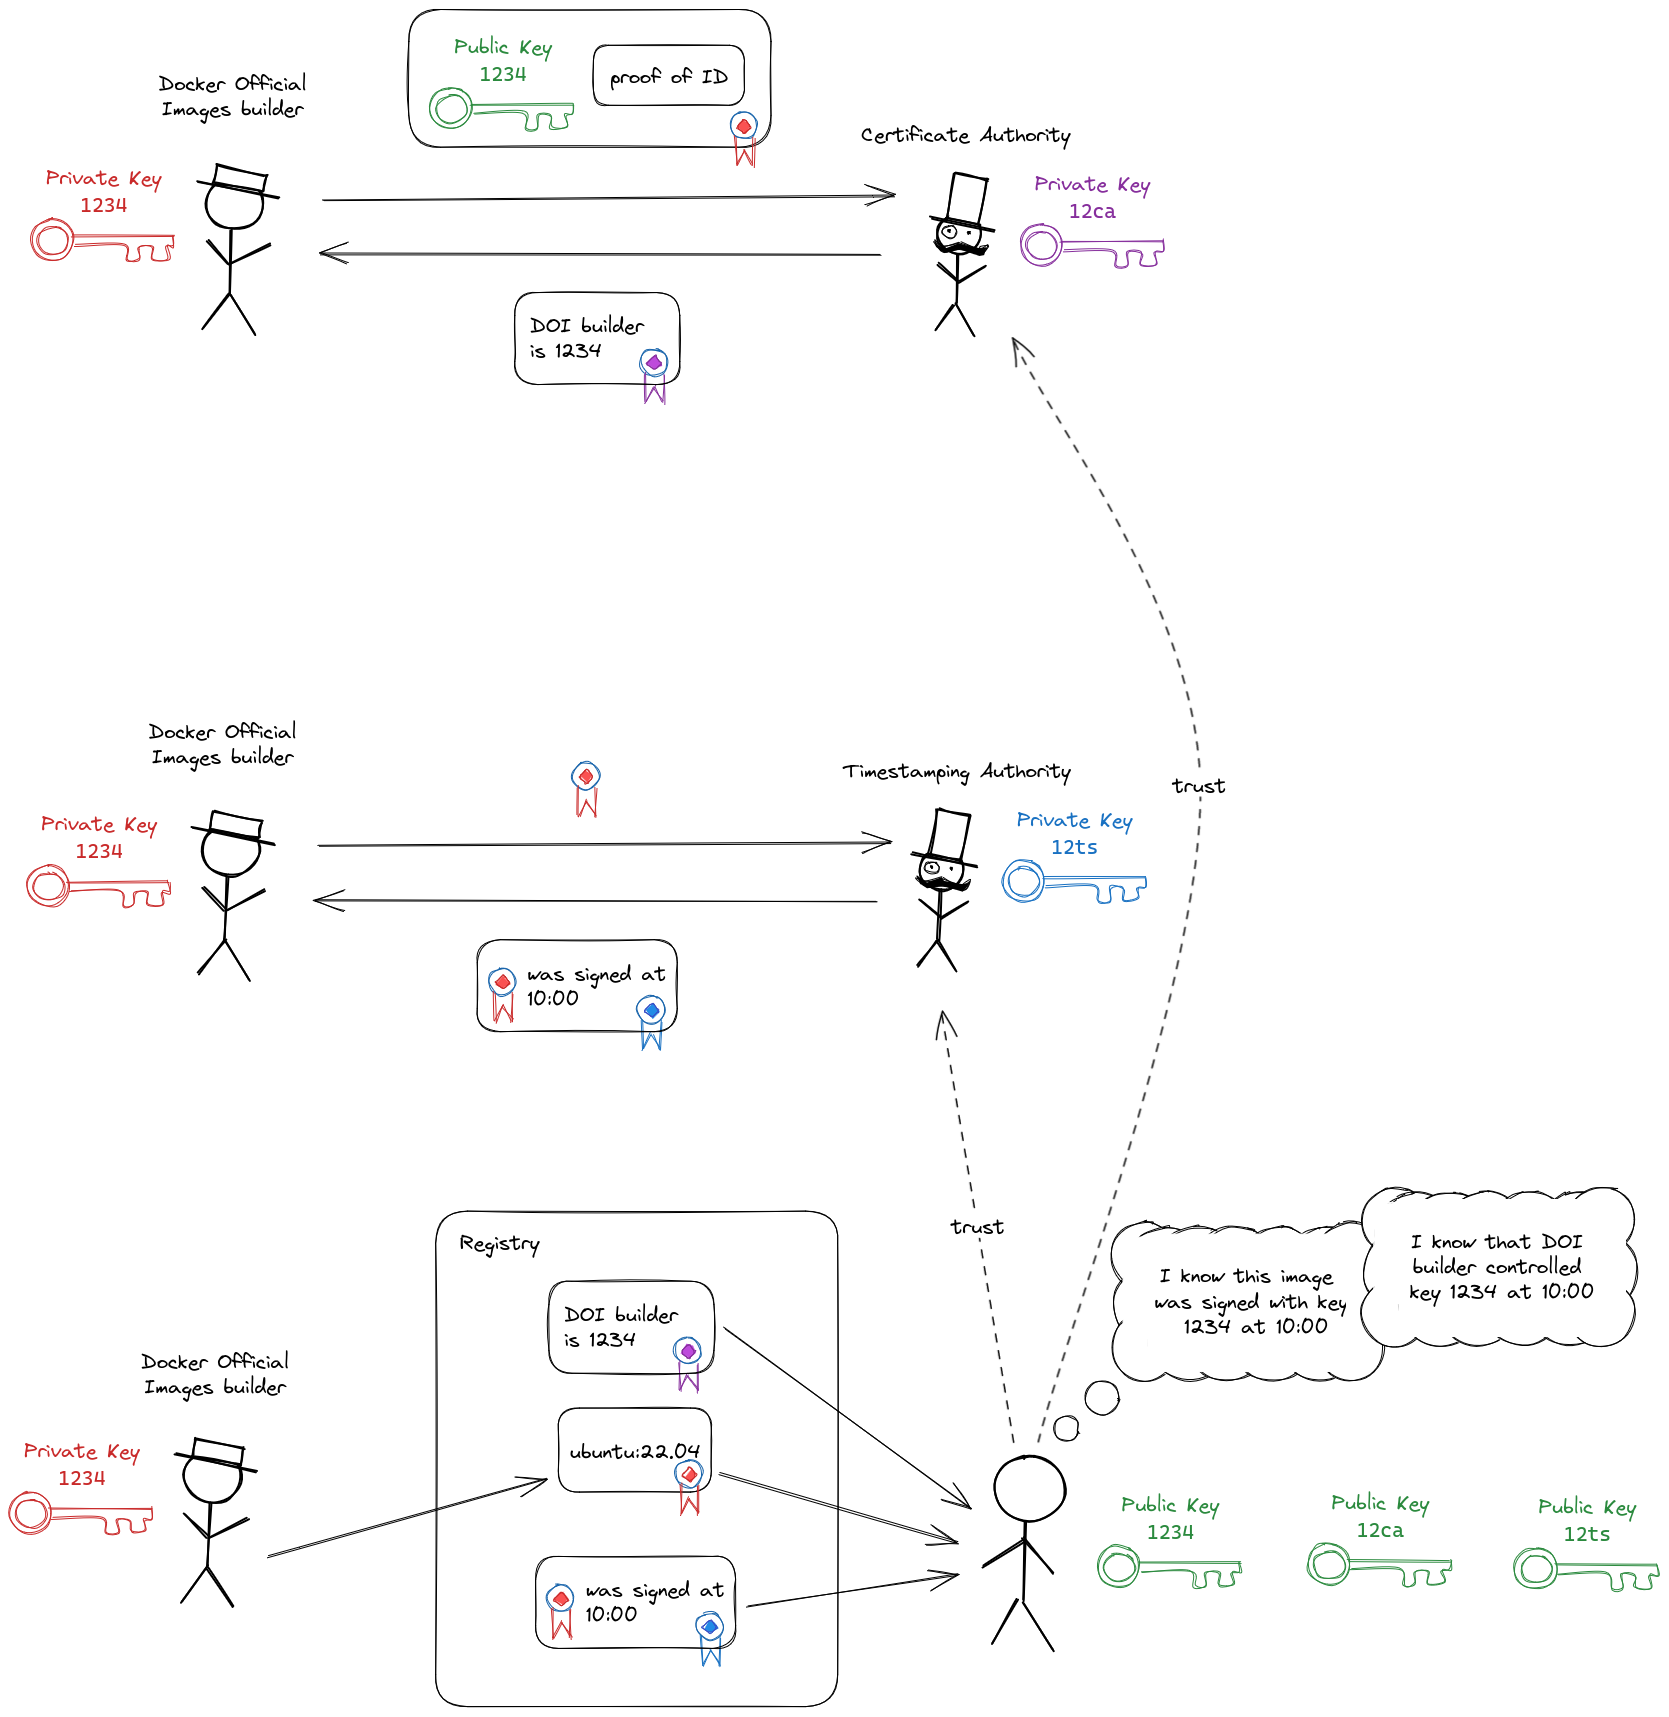
We can send the signature to a TSA and have it bundle the current timestamp with the signature. Then, we can use the bundled timestamp as the ‘current time’ when verifying the certificate. The timestamp proves that the certificate had not expired at the time the signature was created. The TSA’s certificate will also expire, at which point all of the signed timestamps they’ve created will also expire. TSA certificates typically last for a long time (10+ years)(Figure 6).
OpenID Connect
Thus far, we’ve ignored how the CA verifies the signer’s identity (the “proof of ID” box in the preceding diagrams). How this verification works depends on the CA, but one approach is to outsource this verification to a third-party using OpenID Connect (OIDC).
We won’t describe the entire OIDC flow, but the primary steps are:
- The signer authenticates with the OIDC provider (e.g., Google, GitHub, or Microsoft).
- The OIDC provider issues an ID token, which is a signed token that the signer can use to prove their identity.
- The ID token includes an audience, which specifies the intended party that should use the ID token to verify the identity of the signer. The intended audience will be the Certificate Authority. The ID token must be rejected by any other audience.
The CA must trust the OIDC provider and understand how to verify the ID token’s audience claim.
OIDC ID tokens are signed using the OIDC provider’s private key. The corresponding public key is distributed from a discoverable HTTP endpoint hosted by the OIDC provider.
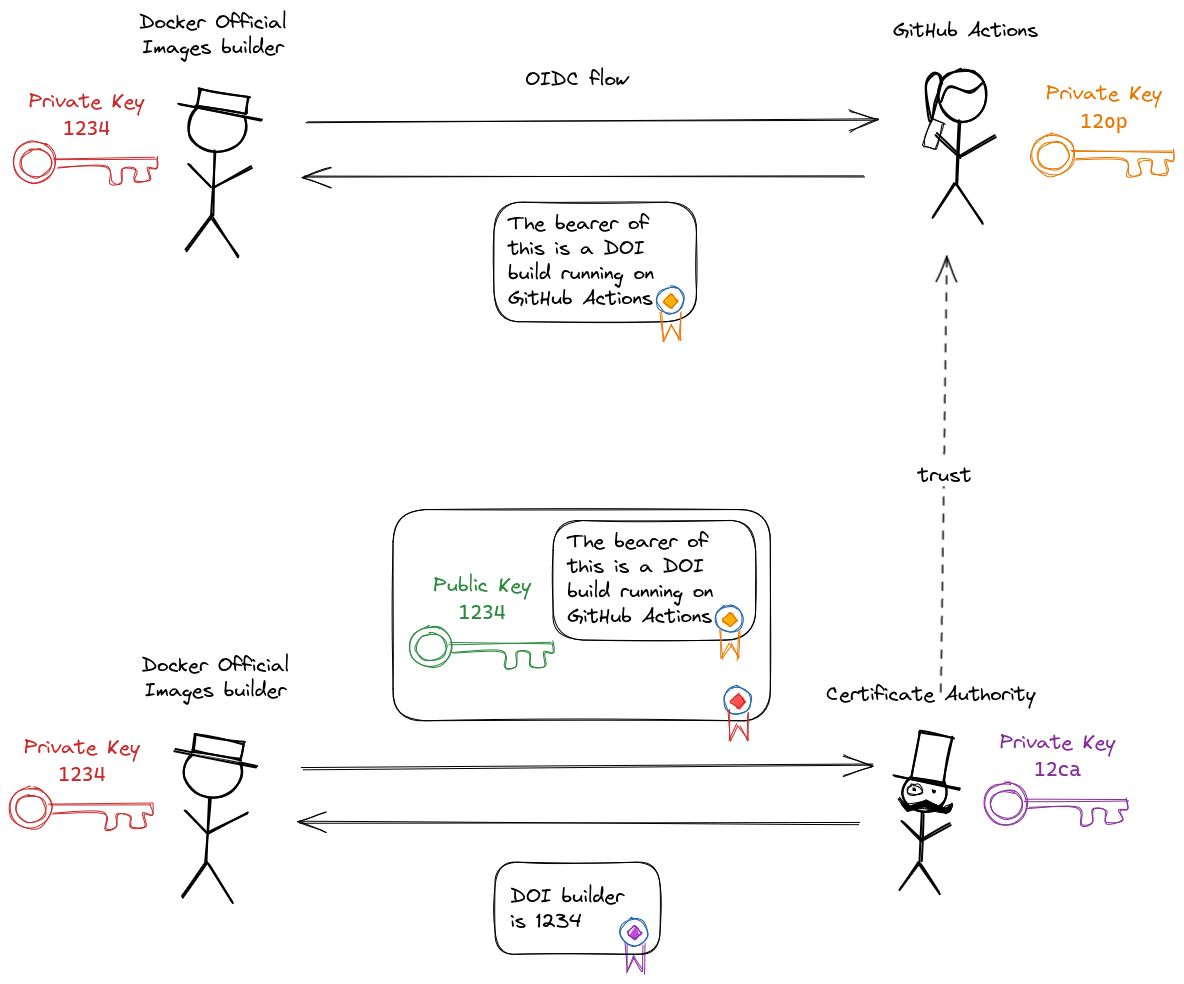
Signed DOI will be built using GitHub Actions, and GitHub Actions can automatically authenticate build processes with the GitHub Actions OIDC provider, making ID tokens available to build processes (Figure 7).
Key compromise
We mentioned at the start of this post that the private keys must be kept private for the system to remain secure. If the signer’s private key becomes compromised, a malicious party can create signatures that can be verified as being signed by the signer.
Let’s walk through a few ways to mitigate the risk of these keys becoming compromised.
Ephemeral keys
A nice way to reduce the risk of compromise of private keys is to not store them anywhere. Key pairs can be generated in memory, used once, and then the private key can be disca