


In a Nutshell
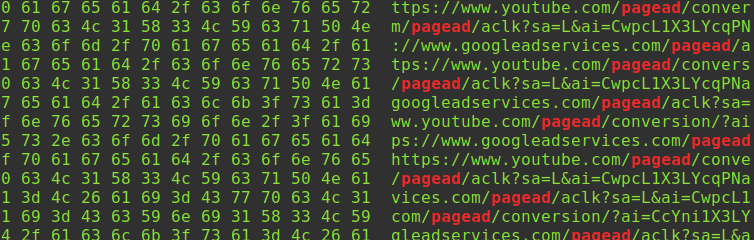
I discovered that putting a man-in-the-middle proxy between my Apple TV and the world lets me decrypt HTTPS traffic. From there, I can read the Protocol Buffer data Google uses to populate YouTube with ads. It is too CPU-intensive to decode Protobuf on the fly, so instead, I found a flaw in the Protobuf format which allows me to reliably change one byte to obliterate ads.
What follows is a reference guide for setting up a bare-metal network router to block malicious ads, obnoxious ads, tracking, clickbait, crypto-jackers, scam popups, Windows spying on you, etc. using blocklists to protect all networked devices.
Goal: Let’s build a cryptographically-strong router with FreeBSD and pfSense to completely block YouTube ads using a flaw in the Google Protocol Buffer format to completely block pre-roll, mid-roll, and end-roll YouTube ads on Apple TV and iPhones, network-wide.
Disclaimer: I want to support content creators, so to be fair, after a few months of blocking YouTube ads, I am now paying for YouTube Premium; Just because I can break something, doesn’t mean I need to.
Sections
Part 1 – Setup pfSense on Bare-Metal
- Why block Ads and Behaviour Tracking?
- Required Router Hardware
- Unboxing the Hardware
- Install pfSense on Bare Metal
- First pfSense Boot
- Enable the AES-NI Cryptographic Instruction
- Enable RAM Disk
- Dashboard Widgets
- Adblocking with pfBlockerNG
- Isolate LANs for Security
- Class B IPv4 172.31.1.0/24 Network for Untrusted Devices
- Add Firewall Rules
Part 2 – Isolate Network LANs
- Setup the Untrusted Wi-Fi AP
- Automatic pfSense Configuration Backups
- Unable to Reach 172.31.1.x from 192.168.10.x
- Replace Stock Firmware on the AC1200 Wi-Fi Access Point
- Archer C5 v2 into the Refuse Bin, R7000 as the New Wi-Fi AP
- Set up the Trusted Wireless Network
- Network Devices Interconnectivity Check
- Windows File Sharing Gotchas
- Public Service Announcement: Edge Browser
Part 3 – Setup DNS Adblocking
- Block Clickbait, Incessant Ads, and Dangerous Sites
- Intercept all DNS Requests, Even to Hardcoded DNS Servers
Part 4 – Trick the YouTube Ad Algorithm
- How to Restrict Apple TV YouTube Ads?
- Trick the YouTube Ad Algorithm Instead
- Research into YouTube Advertizing Spend
- New Goal: Convince YouTube I’m 70 and in Italy
- Selectively Route Apple TV Over the VPN
- Selectively Route Apple TV YouTube Traffic Over the VPN
- Gotcha: DNS Race Condition
- Gotcha: Authentication Trouble, Forbidden 403 Error
- Gotcha: YouTube is Now Showing UK Ads, Not Italian Ads
- Find a VPN Exit Node with no ASN Leak
- Hijack Google Video DNS Queries
- New Goal: Programmatically add IPs to the Firewall Policy Rule
- Research Python Methods to Hijack DNS Queries
i. Rsync Disk Backup
ii. Install pfSense REST API
iii. Explore the Unbound Python Module - Smoke Test: A Python DNS Hijacking Script
Part 5 – Decrypt HTTPS Traffic
- New Goal: Research and install a Squid-like proxy
i. Fun fact: Jailbreaking iPhones in Japan - Install a Fake-but-Trusted CA Cert on Apple TV and iPhone?
- Experiment with Squid and SquidGuard
- Self-Host the CA Certificate
- Abandoning Squid: Too Slow, Too Heavy
i. Rsync Diff of Changes - Install MITMProxy in a FreeBSD Jail
- Exploring MITMProxy
- Patch MITMProxy Source Code for Server SNI Interrogation
Part 6 – Intercept Apple TV and iOS YouTube Ads
- Smoke Test: Intercept YouTube Ads with MITMProxy
- Examine uBlock Origin Regex Patterns for Inspiration
- Surgically Alter the JSON Response to Remove Ads
- The iOS YouTube App Uses Protobuf, not JSON
- Timing Analysis to Detect Ad Videos?
- Decode the YouTube Protobuf Responses
- Ad URL Polymorphism
- Smoke Test: Intercept and Decode Protobuf in Python
i. Pure Python Benchmarks
ii. Pure C++ Benchmarks - Fuzzing the YouTube Video Ad Responses
- Enter Burp Suite Tools for Penetration Testing
- Exfil the Proto Schemas from the App, Cleanly?
Part 7 – Reverse-Engineer Protobuf Messages
- Hardcore Deep-Dive into Protobuf and Wire Format
- Exploit a Protobuf Flaw to Easily Remove All Ads by Changing One Byte
- Smoke Test: Remove Ads from Protobuf in O(n)-Time
- Analysis of this Successful Adblocking Technique
i. Summary
ii. Timing Analysis
iii. Knock-On Benefits
iv. Future-Proof
v. Should Google be Worried? - The MITMProxy YouTube Adblocking Script
Part 8 – Summary
- YouTube Premium
i. Experiment in Ad Viewing
ii. $0.15 as a Ballpark CPV
iii. CPV from US Advertising Spend Divided by Total Views
iv. Is YouTube Premium Worth It? - DMCA, Sony, Viacom
- Summary of Accomplishments
Why block Malicious Ads and Behaviour Tracking?
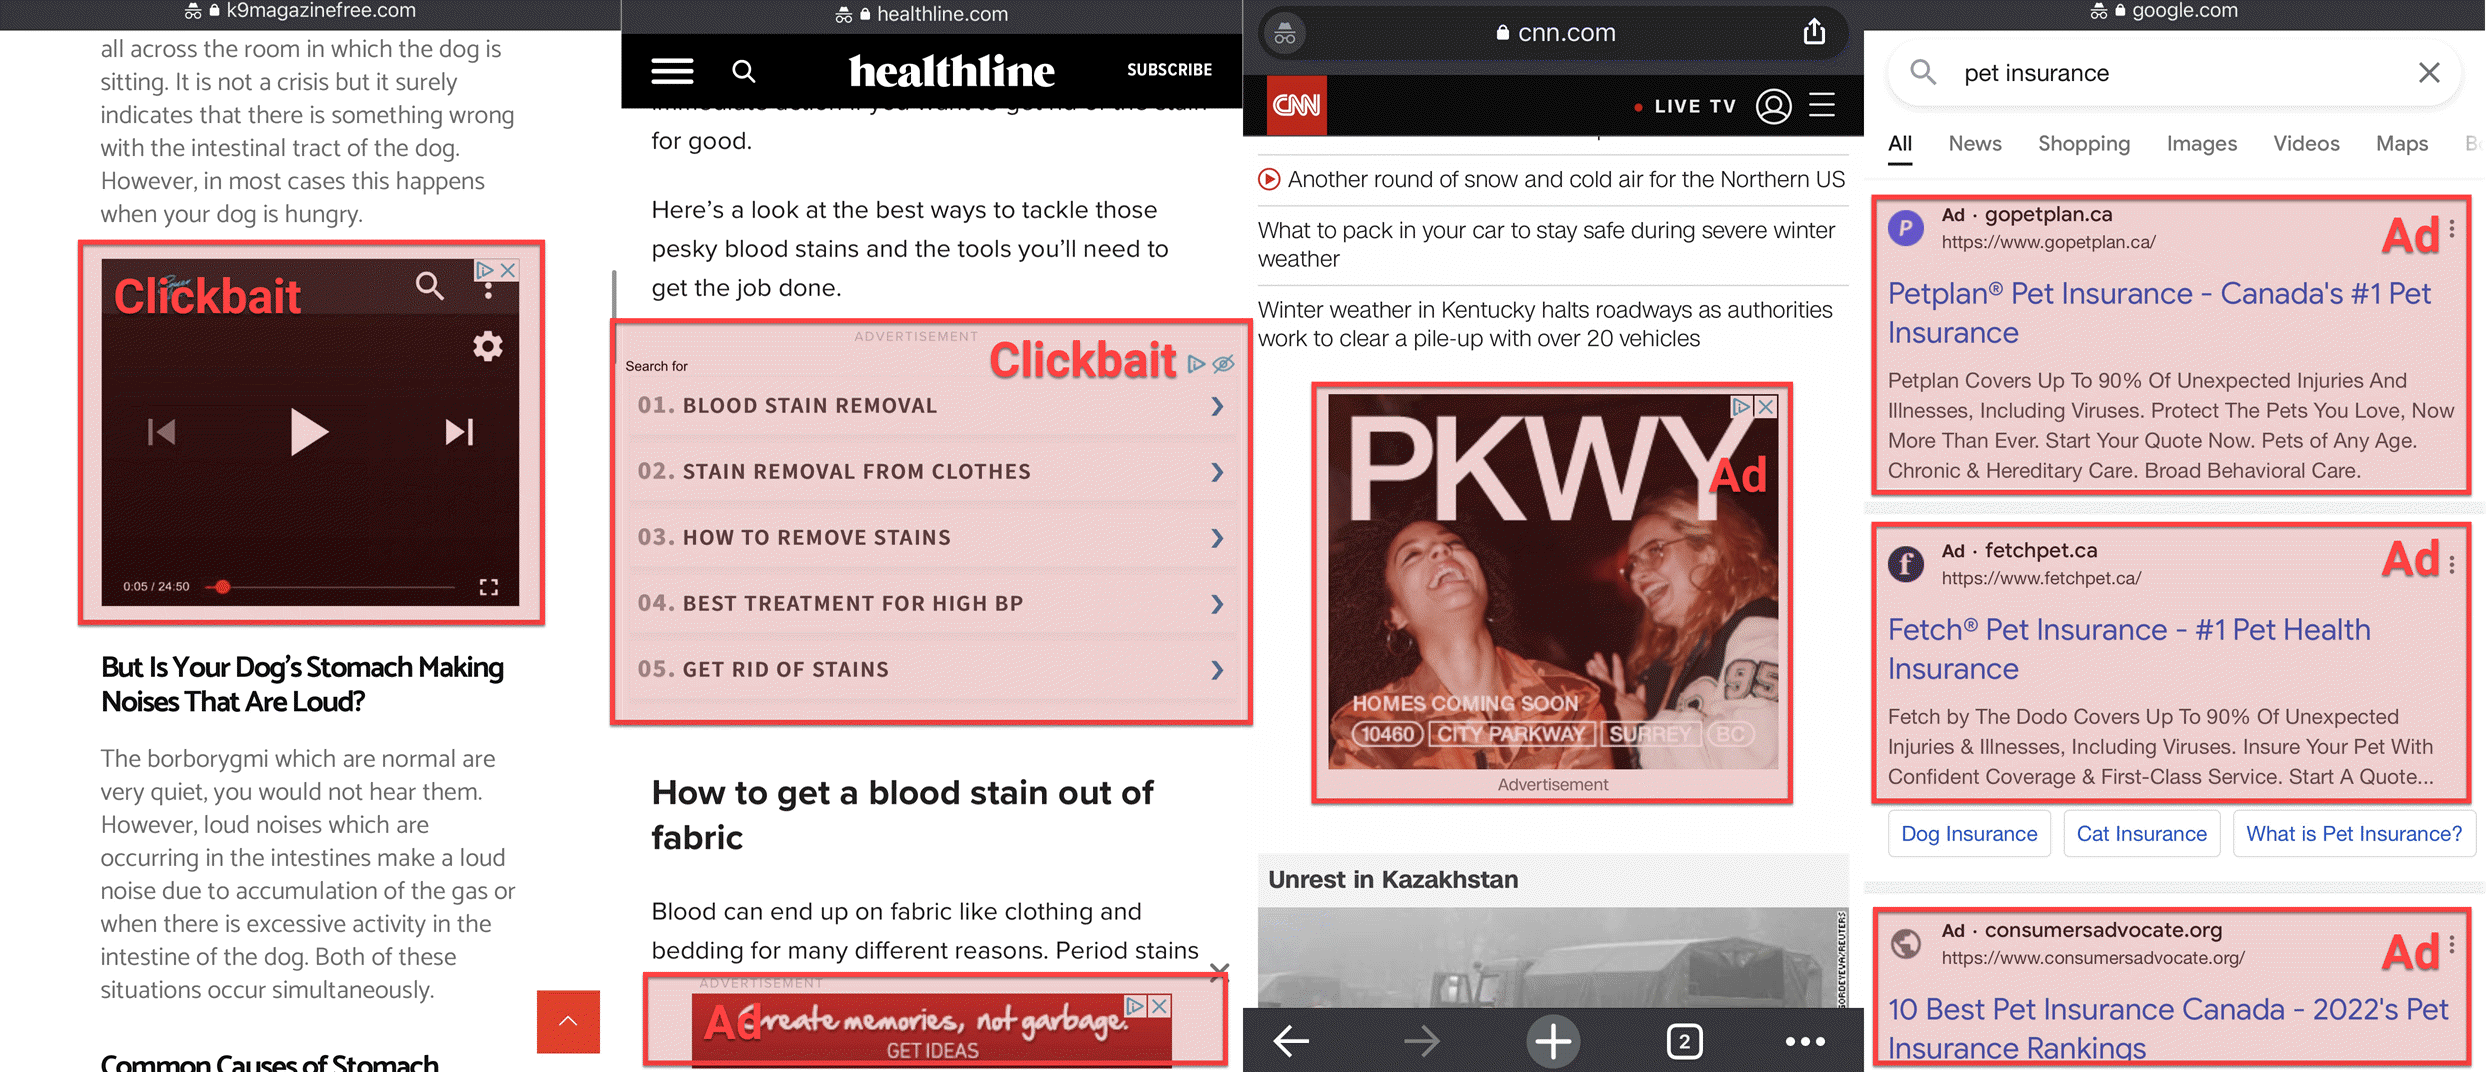
You are a valuable commodity that is bought and sold without your knowledge or consent. You will be tricked with clickbait, distracted with large ads, and enticed to leave the site you are on at every opportunity. Plus, everything you do online is being monitored so your habits and searches can be remarketed and sold over and over again for years.
Privacy – Knowing what you like to watch and read, what phone you have, what you watch on Netflix, what you shop for, what you ask Alexa about, yout taste in music, etc. is unbelievably valuable to advertisers. Spying on people is such a big problem that Europe passed the GDPR law so every site you visit asks if you are okay with cookies (and we blindly click “ok” to hide the banner). We must wrestle back privacy ourselves.
Bandwidth – If privacy doesn’t concern you, how about this: it is well-known that between 25% and 40% of network traffic is ads, tracking, JavaScript to load trackers (fingerprint.js, googletagmanager.js), websocket traffic to collect how you scroll and what you type (Hotjar), and the like. Do you have a 100 Mbps internet connection? Consider it 60 Mbps!
Clickbait – Then there is clickbait. “You won’t believe what Tom Cruise did. He…” and you may want to click. Then you are in the spider’s web. How about fake news? Or articles that don’t say “sponsored” in size-8 font, but now say “underscored” to be clever. What is even real anymore? As soon as you click on clickbait, you may end up on a page with a dozen more ads that aren’t approved by Google but lead to a dark world of maliciousness. Clickbait is so incredibly profitable to scammers.
Cryptojacking – Some websites will load crypto-mining JavaScript (e.g. CoinHive.js) so while you read, they overheat and abuse your computer to try to make a few pennies. Some sites will load JavaScript that tries to steal from your crypto wallet or trick you into transferring cryptocurrency.
Takeaway: It is highly lucrative yet detrimental to you to track and trick you, and only you can do something about it.
Required Router Hardware
A virtual machine, Docker image, or Raspberry Pi are not performant enough to protect a whole SMB network; We need dedicated hardware with a cryptographic instruction set so that its only function is to route, decrypt, and monitor packets in and out. Here is what I used.
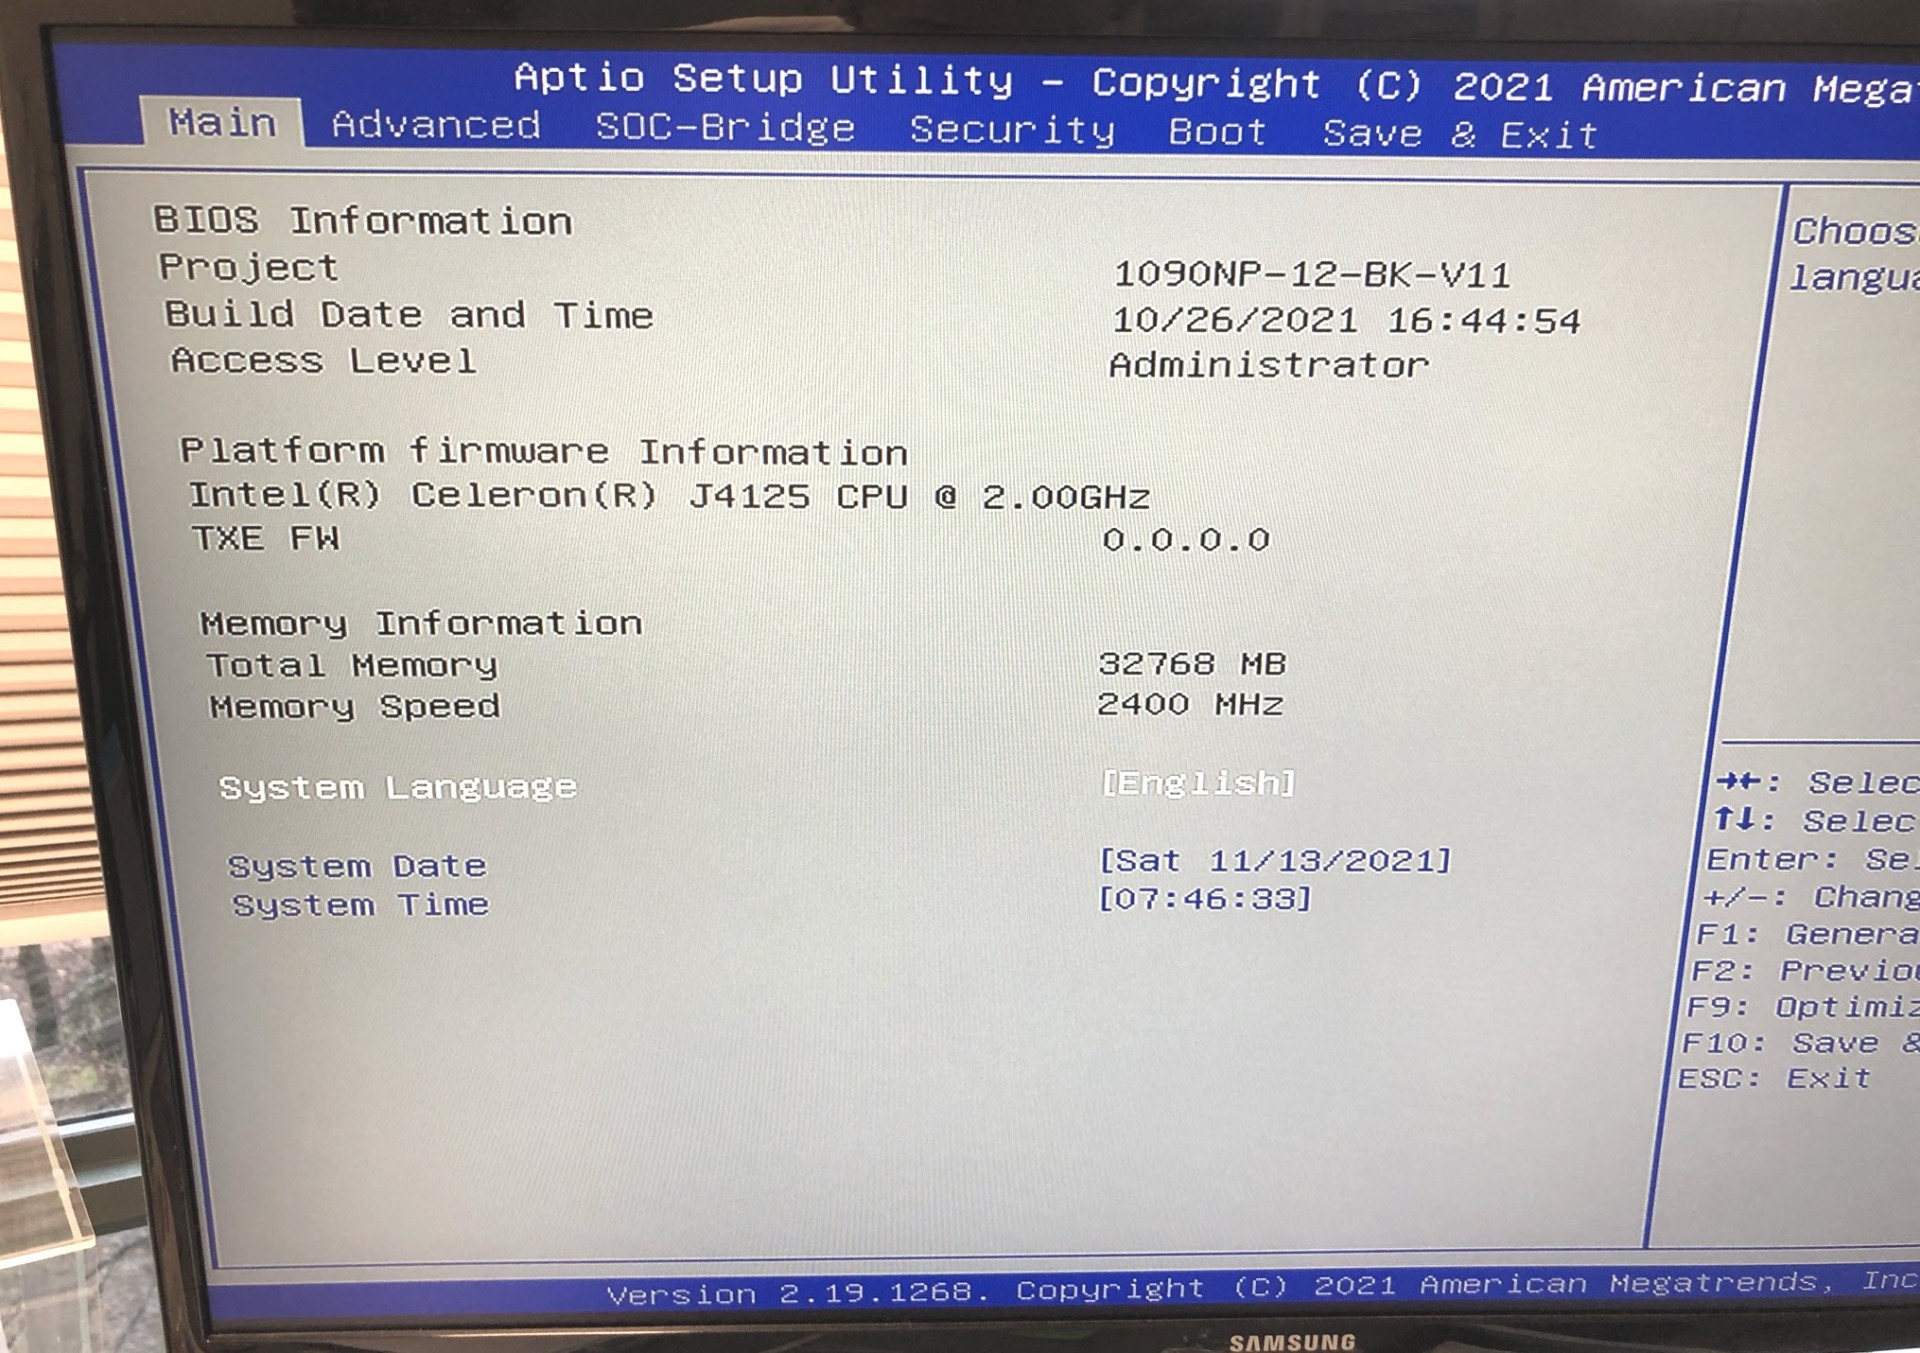
- A mini PC with the AES-NI instruction set (e.g. J4125)
- Several gigabytes of DDR4 RAM (e.g. 32 GiB)
- A decent mSATA SSD drive (e.g. 128 GiB)
- A USB drive to transfer pfSense
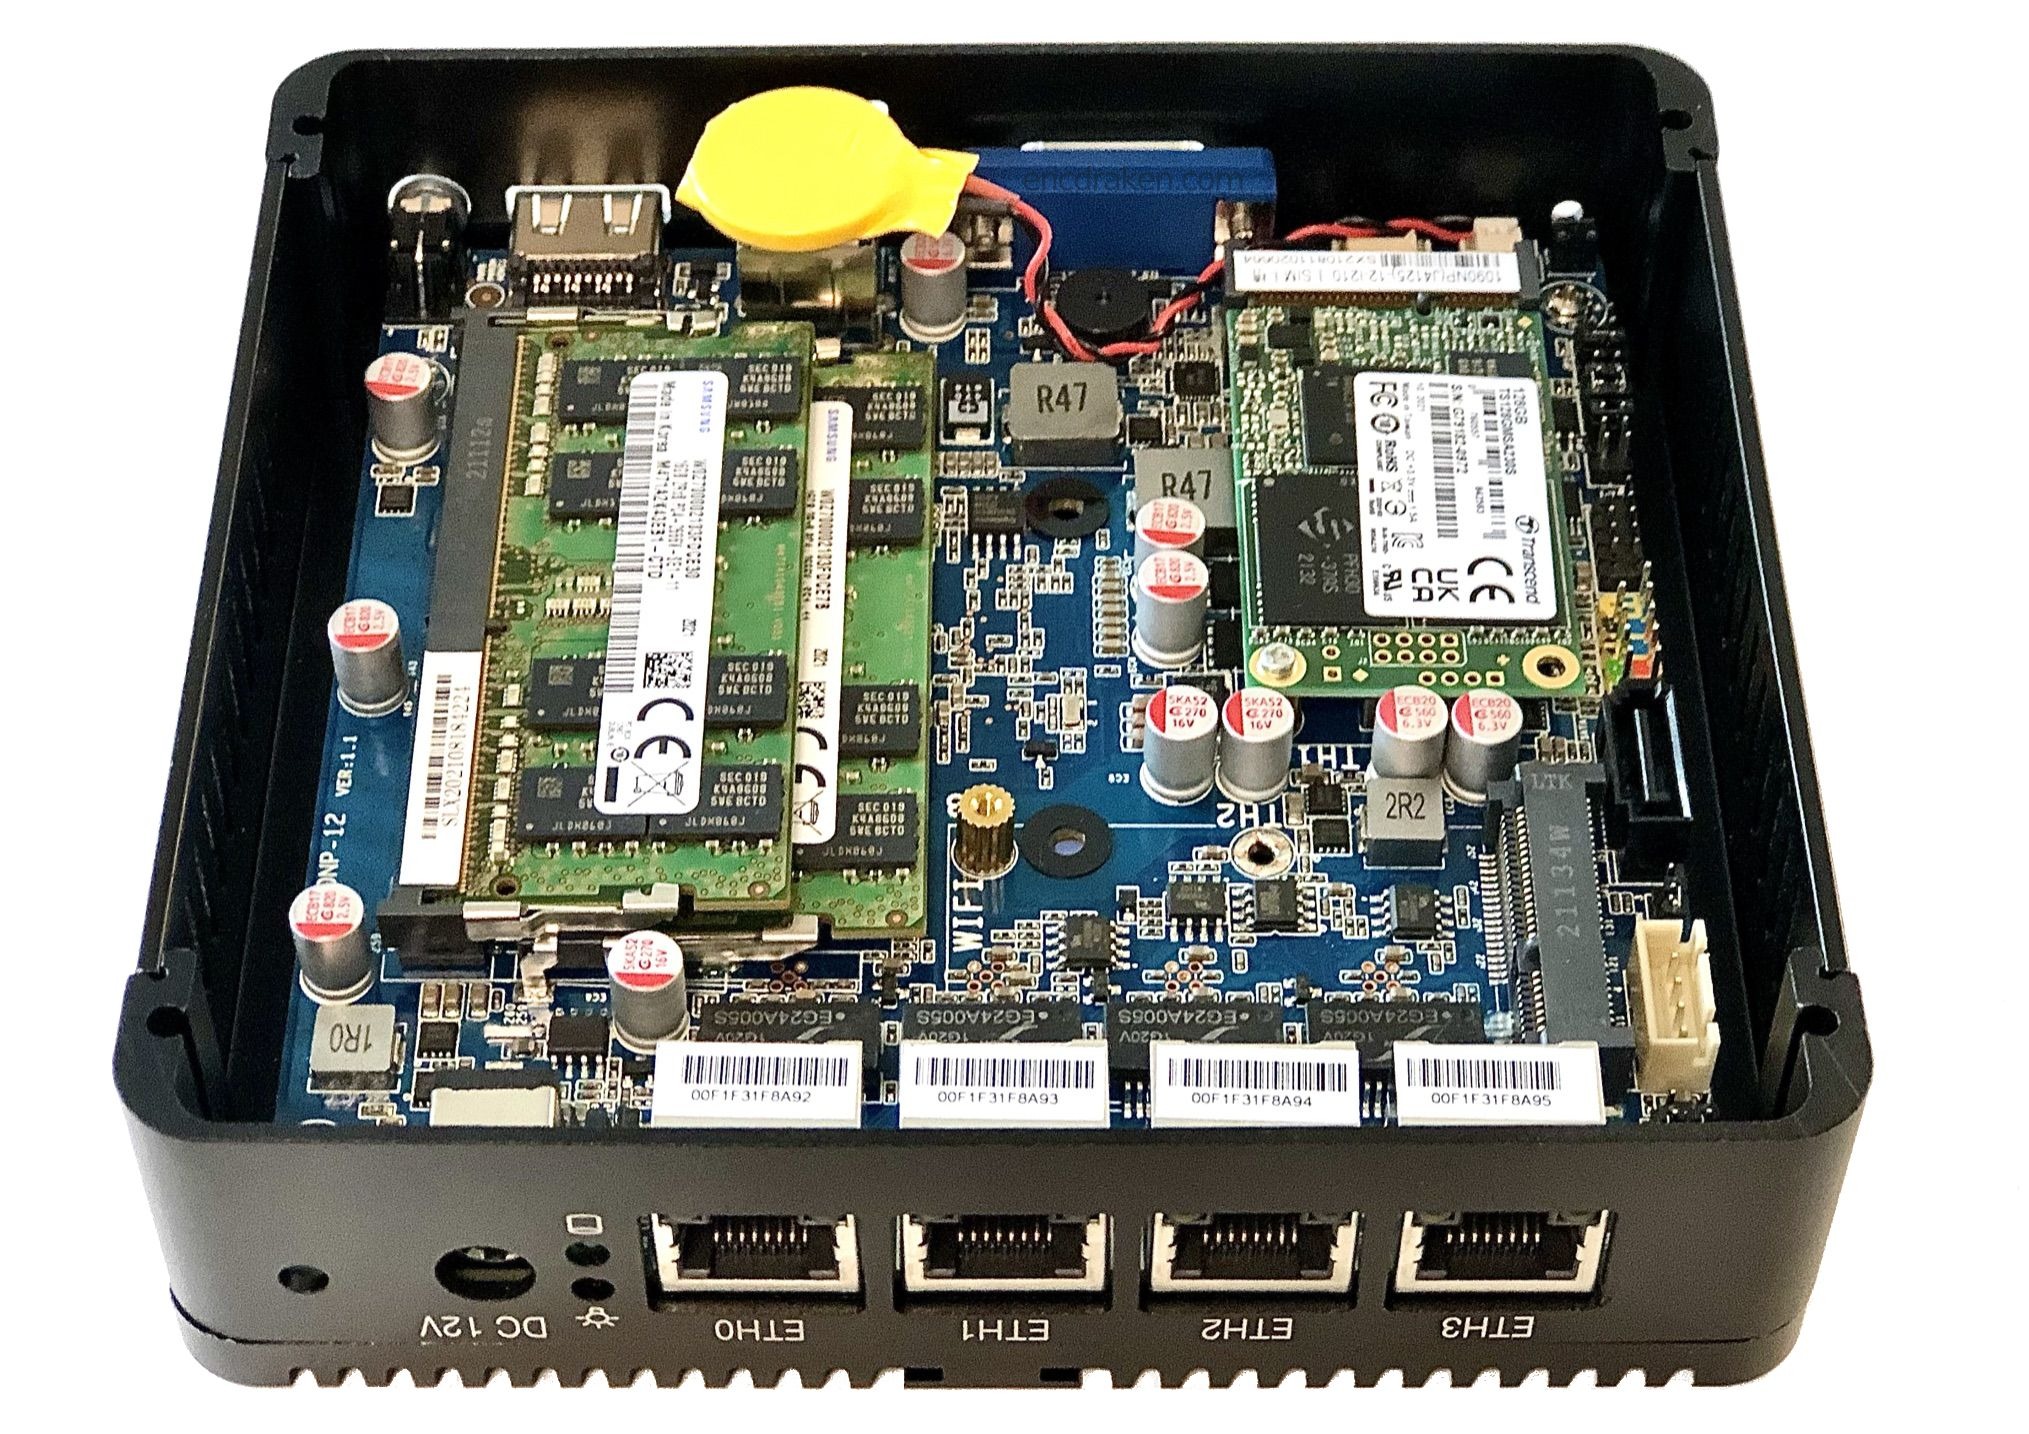
Unboxing the Hardware
I’ve ordered a mini J4125 PC from AliExpress, ordered 32 GB of DDR4 RAM and a 128 GB mSATA from Amazon, and will assemble them for the first time now.
Warning: Out of caution, I searched diligently for a barebones mini PC that did not include RAM or an SSD; there is nothing stopping an overseas seller from including some generic RAM and SSD but charging Samsung prices.
Tip: 128 GB of disk space on a router? Yup. That should be plenty of space to hold logs and not wear down the SSD too quickly, and to allow beautiful packet capture (and maybe an edge cache for NPM and Docker?).
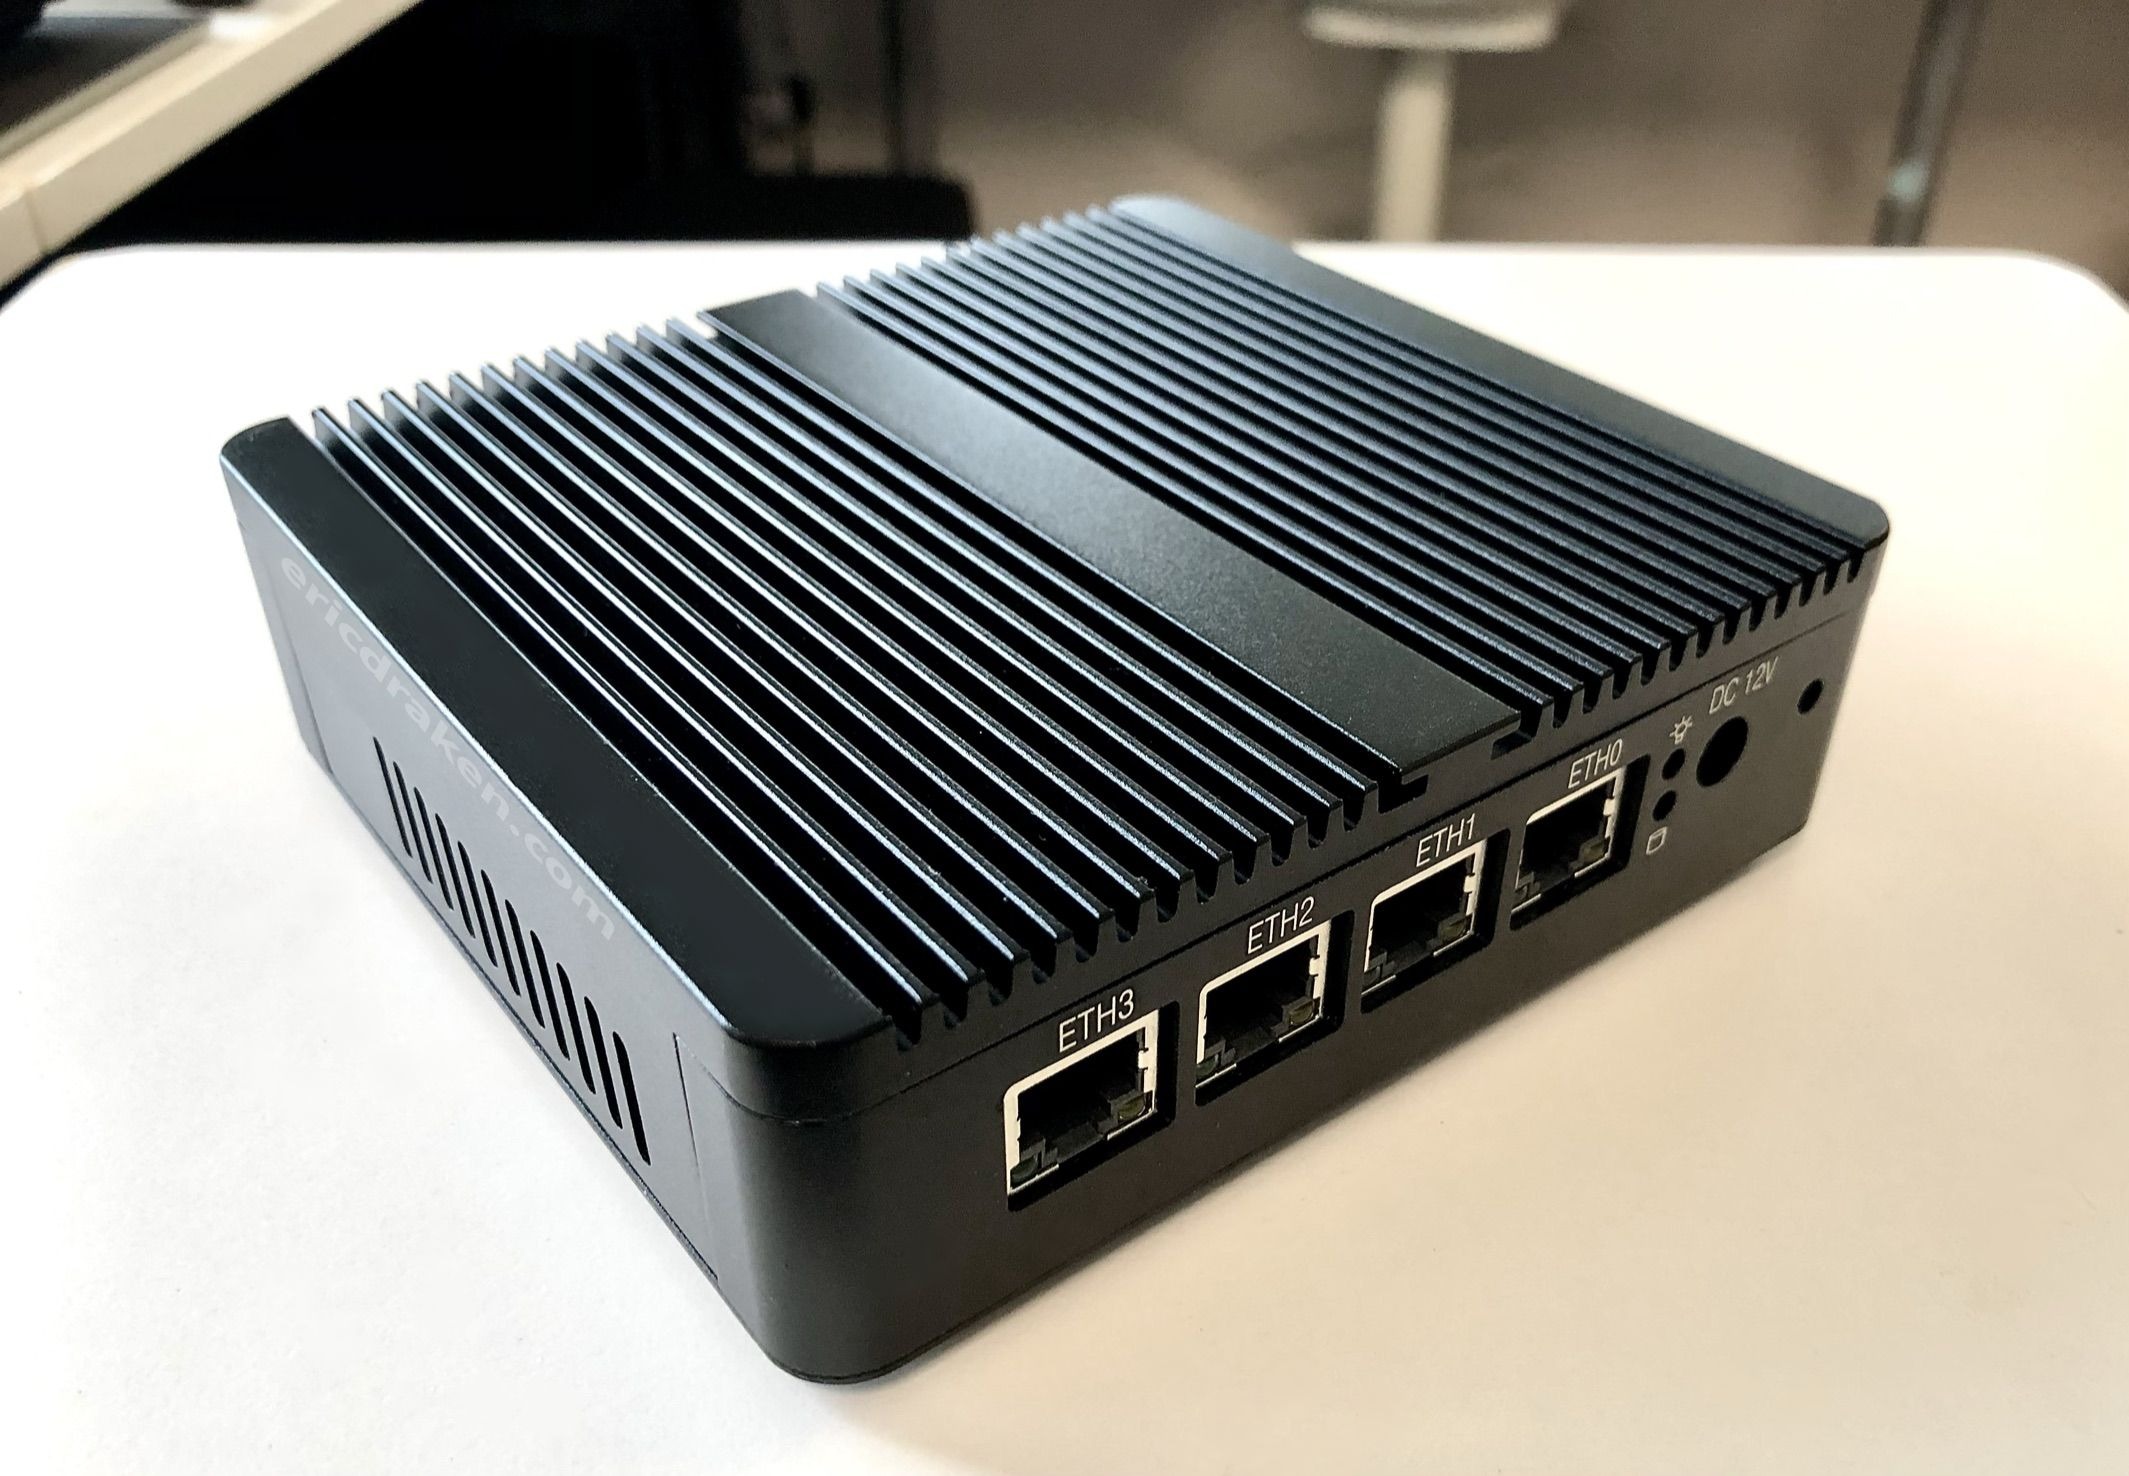
A beautiful box, isn’t it? It only has 3 LAN ports, but it can be extended with network switches.
Install pfSense on Bare Metal
I’ve never used pfSense before, so we will explore this together. The compressed image is about 360 MB and can be flashed to a USB drive with an AppImage binary of Etcher (very cool). Decisions, decisions: VGA install or serial? Let’s serial into the new router. Why not?

Well, that looks painful. It would also be a whole production to serial into the box in case of an emergency because the serial port is inside, and there isn’t even an RS232 or JTAG connector – just some narrow header pins. Yikes. Let’s go with VGA and plug a keyboard into the USB port – get ready to navigate with arrows and tabs.
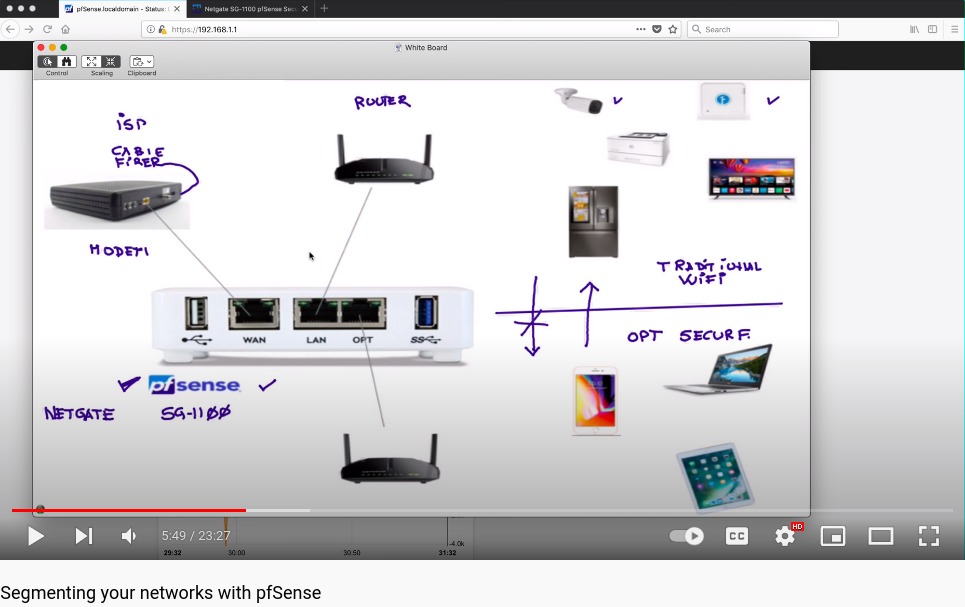
I’ll follow this guide on YouTube. I’ll pass on encrypting the disk since I would like to avoid entering a passphrase each time the mini PC reboots. A stripe disk is fine since there is only one disk. I have no idea what to expect yet, so I will pass on dropping to a shell for a more advanced configuration.
First pfSense Boot
I ejected the USB containing the boot image (important) and rebooted the little box. It played a melody on the internal speaker (there is an internal buzzer and thankfully it isn’t very loud).
Do I need to have a LAN connection already, or can I just start the thing? I’ll just start pfSense and let it complain to me if it wants… and according to the YouTube tutorial, I should guess which port is LAN 1. I’ll do that now.
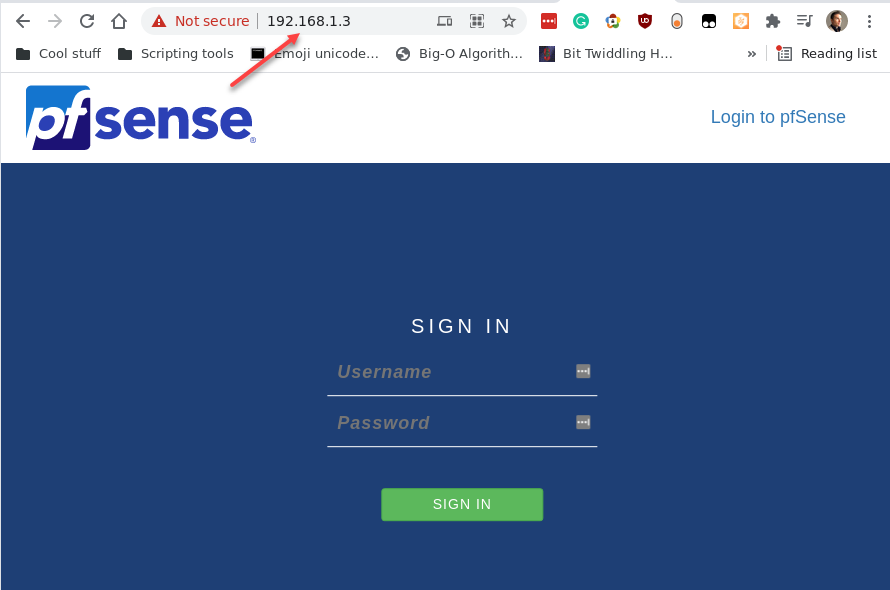
I figured out that I should set the LAN 1 to a static IP address that is not in my existing router’s DHCP range, so I went with 192.168.1.3. Now I can access an admin web portal (admin/pfsense). Hooray.
Yikes, the mini PC beeped at me and informed me that ‘admin’ has logged in. That startled me a bit, but hey that is pretty neat.
Enable the AES-NI Cryptographic Instruction
I played around with the wizard, used defaults, and got to the web configurator. The first thing that caught my eye was AES-NI CPU Crypto: Yes (inactive). I went out of my way to get a mini PC with AES-NI. What gives?
Ah, this needs to be enabled in System > Advanced > Miscellaneous. Why not auto-detect this and use the best option? I’m glad I spotted that, or else this mini PC might as well be a Celeron J1900 of yesteryear.
Enable RAM Disk
Having 32 GiB of RAM, let’s take advantage of that and use a generous amount of RAM for /var and /tmp, and since hopefully this 128 GiB SSD has wear levelling, let’s take a RAM Disk backup every hour.

Reboot! AES-NI is now active.
Dashboard Widgets
This dashboard is pretty slick. I’m just discovering that there are widgets that can be added to the Dashboard, including S.M.A.R.T to alert us if the SSD is going bad. Nice.

Hang on, when I added the Services Status widget, something called PC/SC Smart Card Daemon shows up. What is that? Research shows it’s a daemon for hardware smart keys that we can probably do without(?). It can be disabled in the /etc/rc.bootup file like so:
|
/* pcscd daemon must be started before IPsec */ echo “SKIPPING PC/SC Smart Card Services…”; # echo “Starting PC/SC Smart Card Services…”; # mwexec_bg(“/usr/local/sbin/pcscd”); # echo “done.n”; |
Wait. After some time went by, I noticed the router slowed down, fatally.
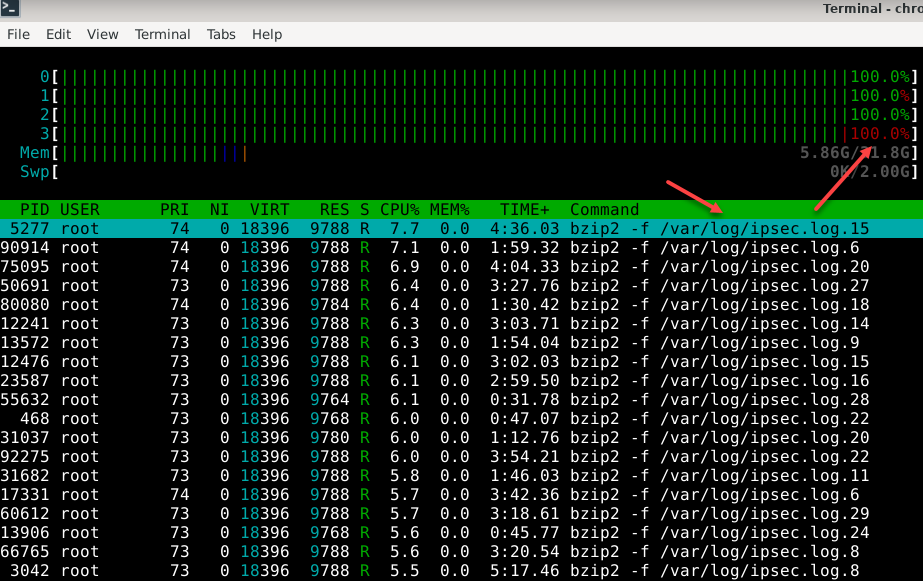
Warning: Do NOT try to disable the Smart Card Service as it is needed by IPsec; if you start experimenting with an IPsec VPN tunnel and the pcscd daemon is disabled, then your hard disk will fill up with logs and your CPU will run hot.
Adblocking with pfBlockerNG
This unboxing and setup has been fun, but I’d like to block all the bad traffic on my network. I’ve been using a workhorse of a DNS-level adblocker called Pi-Hole on a… yes, Pi, but it would be nice if I can reclaim that wee bit of hardware for something else and use a comparable add-on module in pfSense. Let’s explore that now.
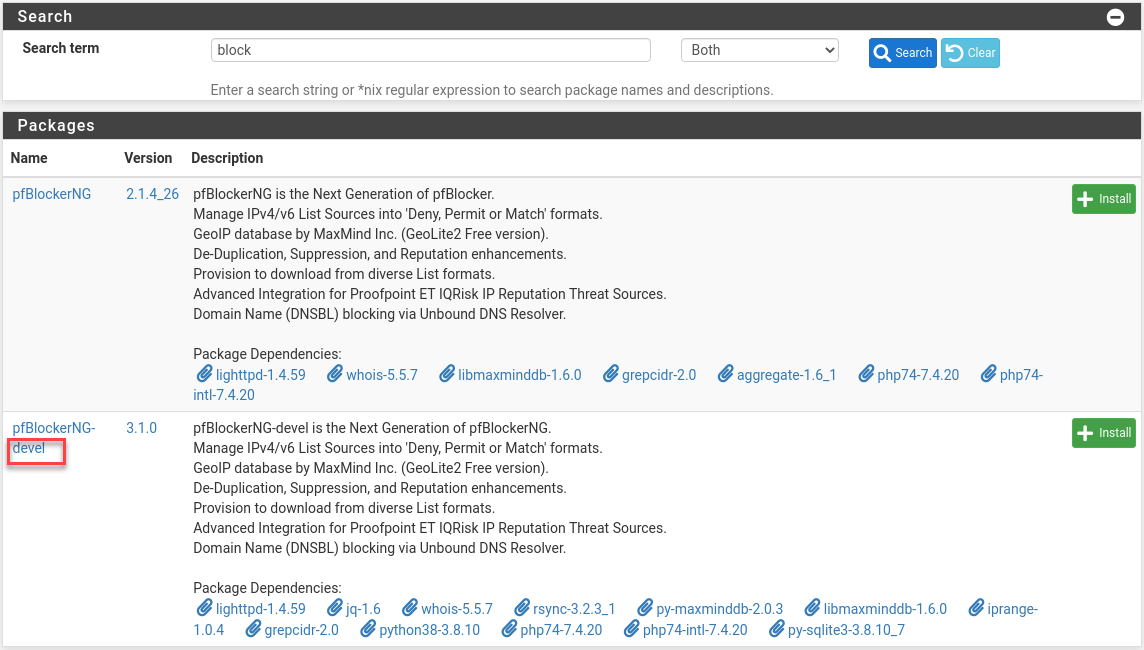
pfBlockerNG is a very powerful package for pfSense® which provides advertisement and malicious content blocking along with geo-blocking capabilities.
Question: Do I install the first pfBlockerNG or the pfBlockerNG-devel which feels like a developer version? I’m a software developer, so this is for me, but am I a pfSense developer? No. Maybe it will show me advanced logs or I can mess about with LUA? Let’s Google this.
From here, random people are saying to install the development version. Another blogger advocates using the dev version as well. Meh, I guess we can install jq, rsync, and Python 3.8. This doesn’t feel like a development version since it has exciting dependencies.
That was painless and only added an extra 20 MiB. It seems a lot of the dependencies are part of pfSense already. The knight at the end of Raiders would say that I have chosen wisely (hey, why did Indy age like a normal person up to Indy 4 if he drank the immortality water that the thousand-year-old knight also drank?).
|
New packages to be INSTALLED: gmp: 6.2.1 [pfSense] grepcidr: 2.0 [pfSense] iprange: 1.0.4 [pfSense] jq: 1.6 [pfSense] libmaxminddb: 1.6.0 [pfSense] lighttpd: 1.4.59 [pfSense] lua52: 5.2.4 [pfSense] nettle: 3.7.2_2 [pfSense] pfSense–pkg–pfBlockerNG–devel: 3.1.0 [pfSense] py38–maxminddb: 2.0.3 [pfSense] py38–sqlite3: 3.8.10_7 [pfSense] rsync: 3.2.3_1 [pfSense] whois: 5.5.7 [pfSense] xxhash: 0.8.0 [pfSense] zstd: 1.5.0 [pfSense] |
Wizard time.
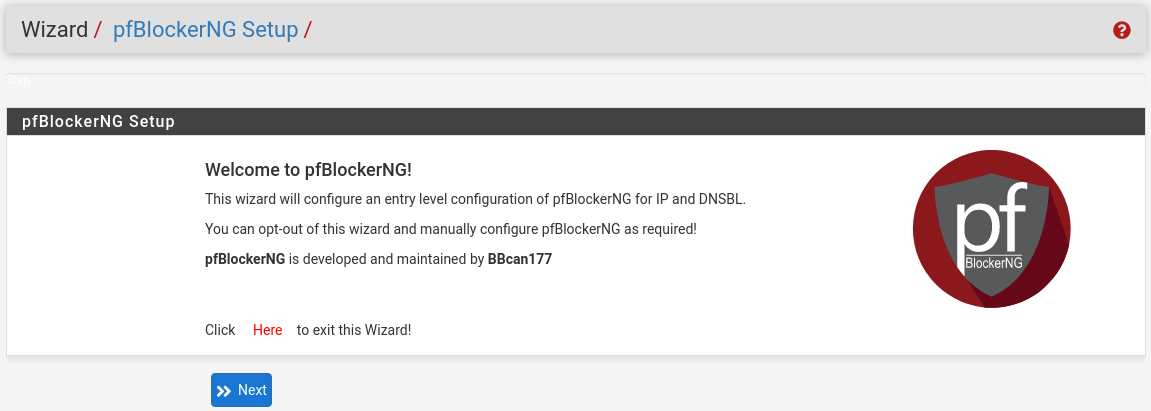
There are a lot of options in step three. This is not like Pi-hole at all. I’m going to come back to this and set up my network instead so I accomplish retiring my Nighthawk R700 or giving it new life as a Wi-Fi AP.
Fix: If the pfb_dnsbl service won’t start or the status tab states [ Missing CRON task ], try deleting the empty file /var/run/booting (ref).
Isolate LANs for Security
An opportunity has presented itself: I can create real networks on each of the three router Gigabit ports (not VLANs), and should I do so? Yes, yes I should. I would like a dedicated hardware network for all my home-phoning spy devices (Alexas and Apple TV) so they don’t flood my network with metrics info and “sure I’m muted and not listening to you” audio payloads back to their HQs.
I can see it now: A Wi-Fi AP on a hardware LAN that is isolated from everything else and dedicated to these gadgets, and runs through the adblocker and traps hard-coded DNS queries to 1.1.1.1 and 9.9.9.9 and others (I’ll have to explore this) so YouTube on my TV doesn’t sneakily bypass Pi-Hole any DNS-level blocker. It’s so Utopian an outcome I may not be able to sleep.
I’ve decided that my bottom-shelf TP-Link wireless router that is so old that AC1200 might as well be “A.D. 1200” is going to be my Wi-Fi AP for those IoT spy devices.
In sum, there will be a dedicated hardware LAN
- with a wireless AP (AC1200) for Amazon/Apple gadgets and the TV.
- with a wired switch for all the beefy computers and clusters in my lab.
- with another wireless AP (R7000) just for iPhones and watches.
As an aside, since doing an Offensive Security hacking course in my spare time, and I rare-earth-magnet-strongly suggest isolating Wi-Fi devices from any critical LAN segments connected to devices that touch daily banking or stock trading (or crypto wallets).
Class B IPv4 172.31.1.0/24 Network for Untrusted Devices
The class B IPv4 range 172.16/16 is a valid range of private IP addresses. I’m not uncomfortable with Alexa and Apple TV being even on the same class network as my main LAN segment, so I will banish them to the class B private network at the hardware level, and my more trusted LANs will be on the traditional class C network (192.168/16). This helps mitigate any misconfigured iptables rules by naturally having no routes between the two networks.

Be sure to enable the DHCP resolver on the physical NIC that will connect smart devices (which mainly just tell me the weather and creepily listen to me sleep).
From this point, DHCP works on this new network, but by default, it assigns IP addresses but does no routing. All traffic is blocked by default.
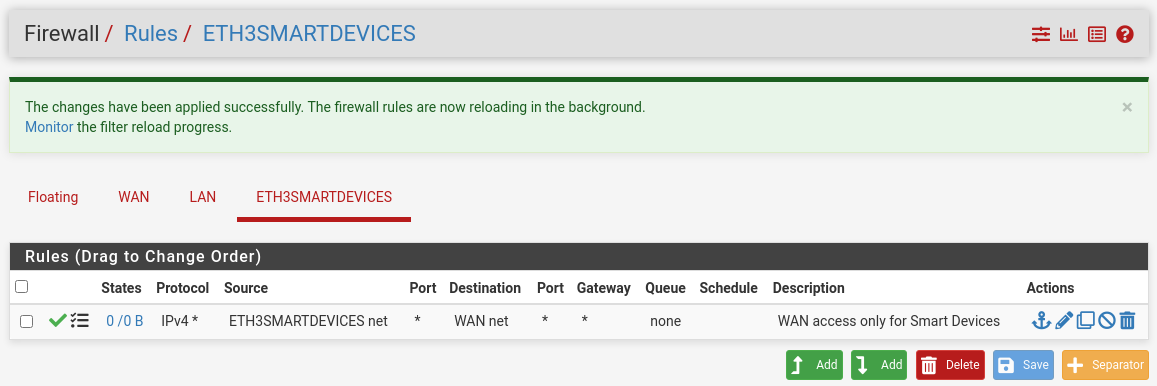
Add Firewall Rules
We need to manually add rules so traffic on the physical NICs goe somewhere.
There is a logging message. Let me reproduce it below.
Hint: the firewall has limited local log space. Don’t turn on logging for everything.
I read that to mean, “Congratulations on not cheaping out on your SSD. Now go forth and log everything, my son.”
I’m not a new-age, fancy-jazz, coloured-light- or smart-plug-controlling guy who forgot how to turn on a light without his phone, so I do not need to have smart devices on the same network as my phone (why create dozens of wireless attack vectors into your home?). I’m classicly trained to actuate an electromechanical current interrupter on the wall and light let there be.
Setup the Untrusted Wi-Fi AP
How do I reach the admin UI of AC1200 Wi-Fi AP now? I factory reset it, plugged the WAN NIC into the ETH3 NIC of the pfSense router, but both devices are just blinking at me.
I suppose I can just Wi-Fi into the factory-reset AC1200. Yikes, 2016 was a bad year for responsive web UIs I take it. This is horrible; I’ll pull out a netbook for this. One sec.
It seems the Archer C5 has no AP Mode. This is my problem, not yours, but I’m still going to vent.
Oh, and the “refresh” icon on the top of the DCHP Leases page in pfSense is not “refresh”, but “reload service”. Whoops.
Well, I bricked the AC1200 router. I will have to run an Ethernet cable manually… but, wait, my thin notebook has no Ethernet ports and needs a USB-NIC adapter. Happy Friday.
Tip: Connect LAN to LAN, not the AP’s WAN to pfSense’s LAN unless you want to do double NATing.
There were shenanigans, but I set the LAN IP of the AC1200 to 172.31.1.100, the ETH3 NIC IP of the pfSense router to 172.31.1.1/24, and set the pfSense DHCP service on ETH3 to assign addresses 172.31.1.101~150. What failed was setting the AC1200 to 172.31.1.2 as it was unreachable (reason unknown). Oh yes, I had to turn off firewally things and NAT Boost, and basically drop the horsepower of this TP-Link router down to that of a potato battery. The above settings allow me to access the AC1200 remotely now.
The other video ran its course, so I started following this YouTube video (set the speed to 1.5x).
One more thing: I installed the nmap package for pfSense and scanned the AC1200 router, and found some sneaky ports open.
|
Running: /usr/local/bin/nmap –sT –P0 –e igb1 ‘172.31.1.100’ Starting Nmap 7.91 ( https://nmap.org ) at 2021–11–15 17:40 PST Nmap scan report for 172.31.1.100 Host is up (0.0017s latency). Not shown: 969 closed ports, 28 filtered ports PORT STATE SERVICE 22/tcp open ssh 80/tcp open http 20005/tcp open btx |
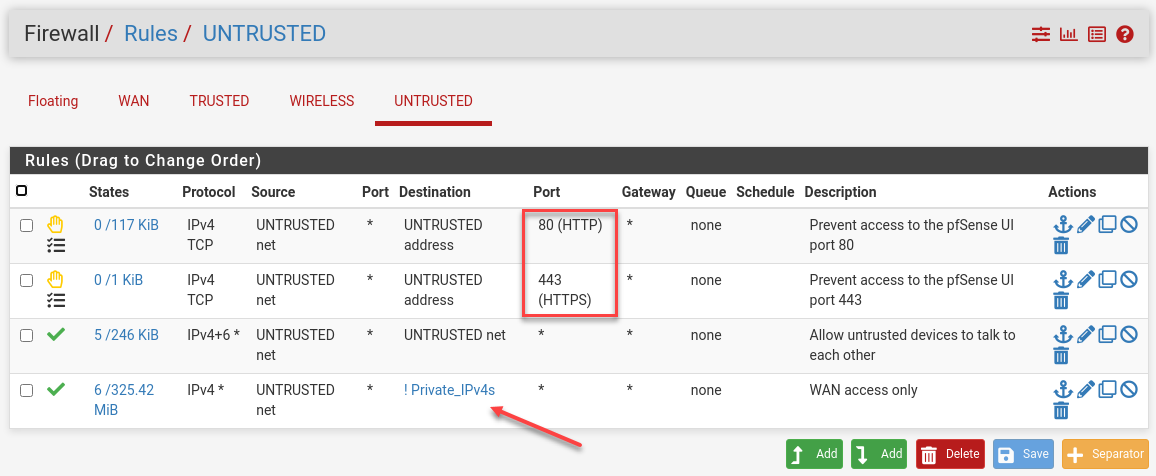
Port 20005/tcp is a print server port that I’ve now closed. However, the Archer C5 AC1200 is vulnerable to all kinds of Kali mischief so it was wise to put it on its own network. I’m not sure how to close port 22 and the SSHd service on it the AC1200 because the stock firmware is ancient and crippled, so I’ll just have to block port 22 on the whole LAN segment.
I’ve also taken care of disallowing private networks to ingress on the WAN (see the next section to set up DMZ).
Unable to Reach 172.31.1.x from 192.168.10.x
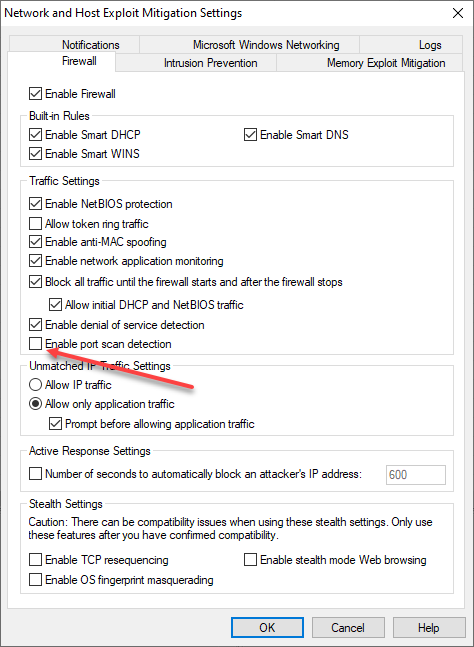
Ping and Traceroute are aiding me in my efforts to connect to the AC1200 Wi-Fi AP from my Trusted LAN. I went ahead and added the subnet to the Symantec Firewall rules just in case (Symantec has its place now and then, but yes, definitely have available PC CPU horsepower to spare).

Now, it seems ICMP packets are no longer blocked between networks, but I still cannot ping the AP web management UI even though I can see the pings in the traffic logs.
I’ve even added an “any to any” firewall rule on the Untrusted network. No change.
Warning: If you run nmap as I did, software firewalls may detect a port scan and kick your network connection for an hour by default.
Let’s try a stealth scan instead: sudo nmap -sS -v 172.31.1.*.
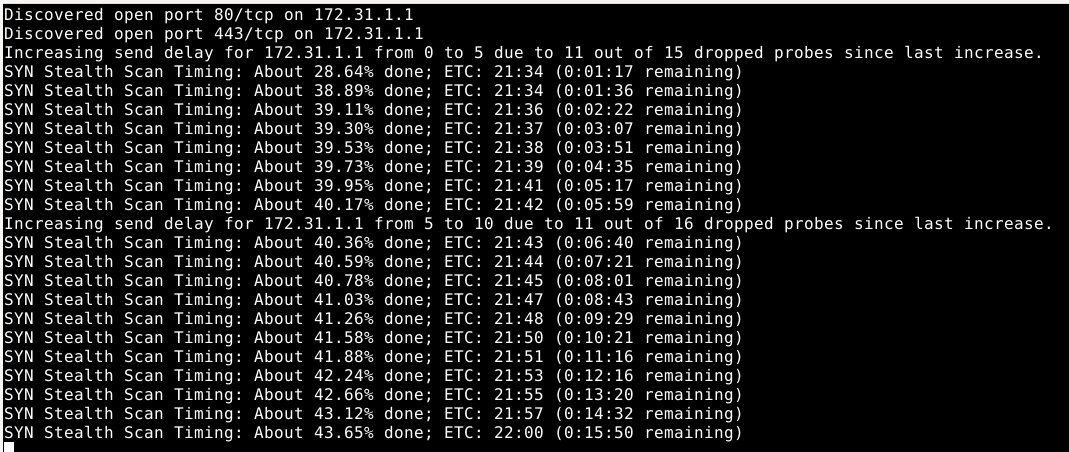
Nope, pfSense doesn’t like that at all. And, the whole network stopped working. Nice security! Also, dang.
The good news is that I’ve isolated the packet malaise to the TP-Link AC1200 box itself. I suspect that I need to add net.ipv4.ip_forward=1 to forward packets with no addresses in them, but I’d need root access to the AC1200. Let’s burn it to the ground and rebuild from its sprinkler-soaked ashes.
Replace Stock Firmware on the AC1200 Wi-Fi Access Point
Of course, I cannot actually stop Untrusted LAN devices from reaching the AC1200 as they all exist downstream from the pfSense box.
DD-WRT open-source router firmware, meet my ancient Archer C5 and do your thing.
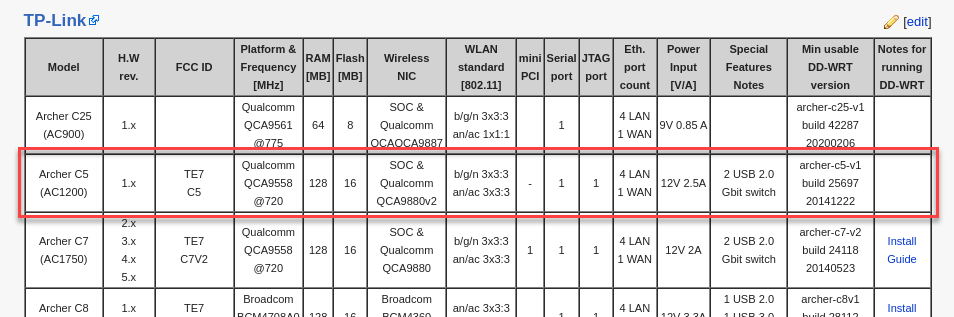
The Archer C5 did not accept the DD-WRT firmware. Hmm… how about OpenWRT?
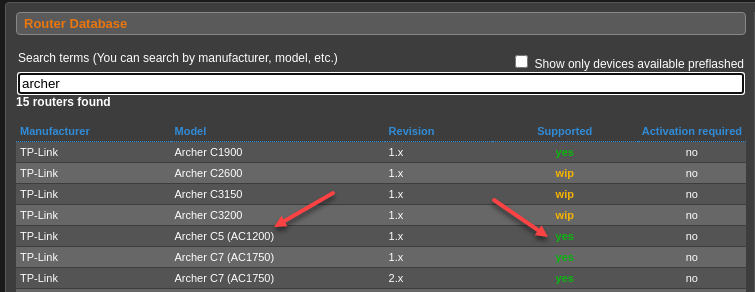
The Archer C5 did not accept the OpenWRT firmware either. What the actual facepalm (WTAF)?
Wait. My hardware is revision 2 using the Broadcom chipsets which are notoriously difficult networking chips.
Careful: Devices with Broadcom Wi-Fi chipsets have limited OpenWrt supportability (due to limited FLOSS driver availability for Broadcom chips). (REF: OpenWRT.org)
Alright, so OpenWRT, DD-WRT, and Tomato projects have no firmware for this AC1200 with unpopular Broadcom chipsets. Into the refuse bin it goes.
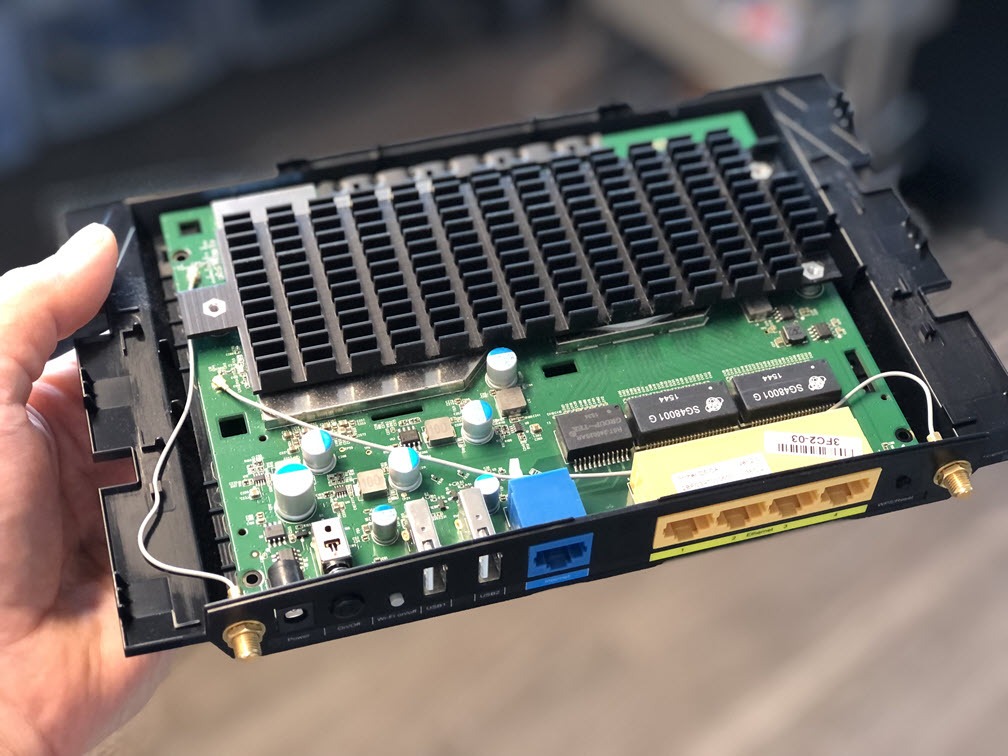
Archer C5 v2 into the Refuse Bin, R7000 as the New Wi-Fi AP
I’ve dismantled the AC1200 so I do not forget why I threw it out. It’s too bad because it’s so pretty on the inside, and they always say, “It is what is inside that counts… except if you are a router with Broadcom chips.”
The R7000 is factory reset, and here is the first problem:
Tip: On factory reset, the Nighthawk R7000 is pretty uptight about the format of the password. One rule is that no more than two identical consecutive characters are allowed. Well, thanks Netgear for pretty much providing a Regex to password crackers. Let’s disable all those rules with a few keystrokes to delete the JavaScript “blocking” the form submission. Now my admin password does not conform to the Regex and is super long. Muhahaha to Netgear password crackers.
The R7000 is in AP mode, but I can still access the pfSense web management page from the Untrusted network. Let’s lock down the web UI in pfSense under Firewall Rules.
Set up the Trusted Wireless Network
The Untrusted network is now looking good. It’s time to make the other R7000 Nighthawk I have into a Wi-Fi AP as well so my phone and watch have a safe place to connect to, as well as a laptop when I want to RDP into my wired machines from the kitchen. I was saving that for a honeypot AP, but I can come back to that later.
Let’s see if I can Wi-Fi into the Wireless LAN’s R7000…
Tip: Remember to physically unplug the pfSense upstream router from the R7000 because the R7000 is too helpful and will enter into AP mode by sensing any upstream routers, then you cannot get into the web UI anymore.
Since only my trusted devices should be on the Wireless LAN, I’ll turn off 2.4 GHz wi-fi because anything recent and wireless should support 5 GHz. That means those pesky AliExpress Pineapple wi-fi password stealers on the cheap side only use 2.4 GHz, so a neighbour is going to have to put in some effort to snoop on my network. Plus, 5 GHz is blocked more easily by walls and concrete, so I prefer it for averting medium-range snooping. But, I so am going to set up a honeypot and to brake check my faith in humanity.
It is normally straightforward to put a Wi-Fi router into AP mode by disabling WAN and DHCP.
Network Devices Interconnectivity Check
Do all my dozens of computers, laptops, Pis, clusters, NAS drives, and the like still connect as before? Most important is my web-scraping bot in a hardened, RAIDed, dedicated machine with its own UPS. But alas, I cannot SSH into it even though the SSH handshake packets make it to the hefty box.
Could this be our old frienemy IPv4 forwarding being disabled? Possibly. I’m able to SSH into the machine from my iPhone (seriously) when on the same network.
Nope. Adding net.ipv4.ip_forward = 1 in the right place with a restart did not yield joy.
According to dmesg -w (to tail dmesg logs), UFW (Uncomplicated Firewall) is not blocking ICMP requests or TCP requests on port 22. When I do something nutty like try to SSH on, say, port 23, then I can see the UFW block logs in dmesg. Confirmed: Packets can reach that machine.
Running tcpdump src 192.168.10.100 where the IP is from the Trusted network on the target machine shows it is responding to pings. I’m even getting replies to SSH handshake requests. So now we know that return packets are being dropped. Interesting! Aside: tcpdump is awesome.
Let’s follow the trail. Digging a little deeper I see replies to ICMP and SSH handshakes are being sent to some IP over HTTPS that I do not recognize. Bizzare. When I run the usual ipinfo tools I see that replies are going over a VPN that I completely forgot about. Ha. Replies to a different subnet are egressing over the VPN, but cannot return properly. Neat.

Now that I remember what I did in 2019, I re-added NAT alias rules, and it’s showtime again.
Windows File Sharing Gotchas
Your path may be smoother, but I’ve always seem to make the Trench Run instead of remote-piloting a handful of lead-filled X-Wings at light speed right through the Death Star’s reactor to make it go boom: the easy way.
I’ve added some rules to allow Static DHCP devices to talk to each other – Windows devices – but by default, the Private Network in the Windows Defender uses the local subnet as the rule scope. That means different subnets are isolated. We can’t just relax the pfSense DHCP subnet mask to say 192.168.20.0/16 because it conflicts with another subnet. Instead, just to get file sharing working, I relax the scope in Advanced Settings like below. Be sure to modify In and Out for SMB and ICMP.

Again, please add whatever subnets you desire instead of any.
Public Service Announcement: Edge Browser
Why does the Microsoft Edge browser start automatically and run in the background, and why can’t I kill it when I ctrl+alt+del? If you’ve asked yourself this, you’re not alone. It turns out Edge starts up when you log in and it keeps running in the background. Here is the fix:
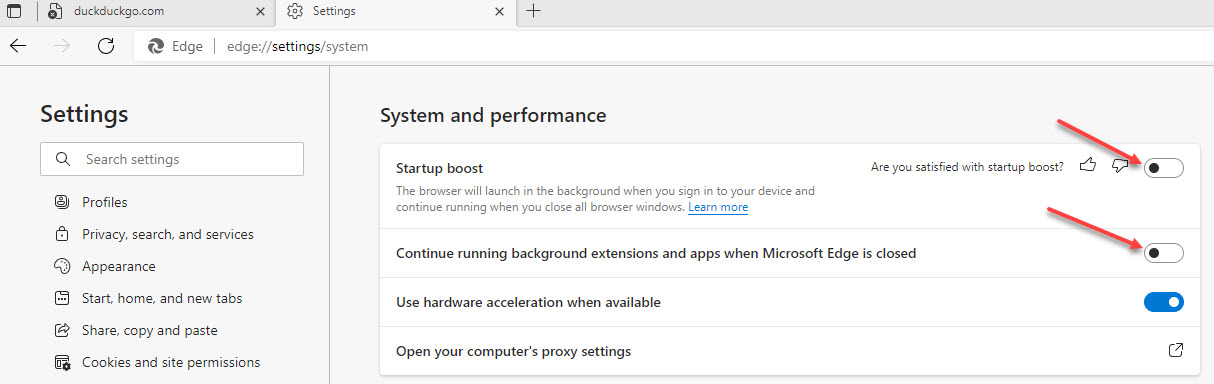
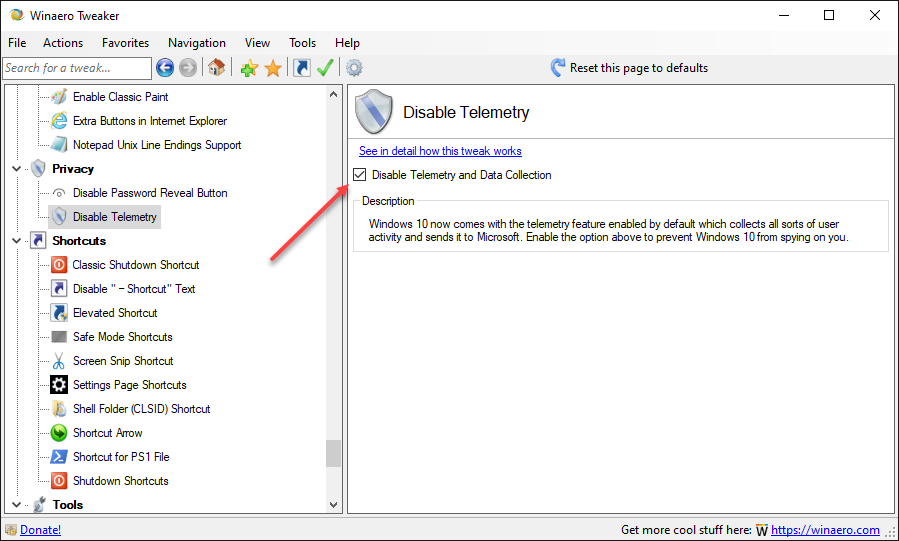
I suggest downloading Winaero Tweaker and applying registry tweaks to cut down on the Redmond Spy Machine.
Block Clickbait, Endless Ads, and Dangerous Sites
Thanks to web-browser and DNS-level adblockers (i.e. Pi-hole), it’s commonplace to block bad sites, crypto-miners, fingerprinters, trackers, remarketers, banners, pop-ups, fake tech-support scam alerts, and all manner of unscrupulousness designed to take advantage of you. Let’s take pfBlockerNG on pfSense for spin.
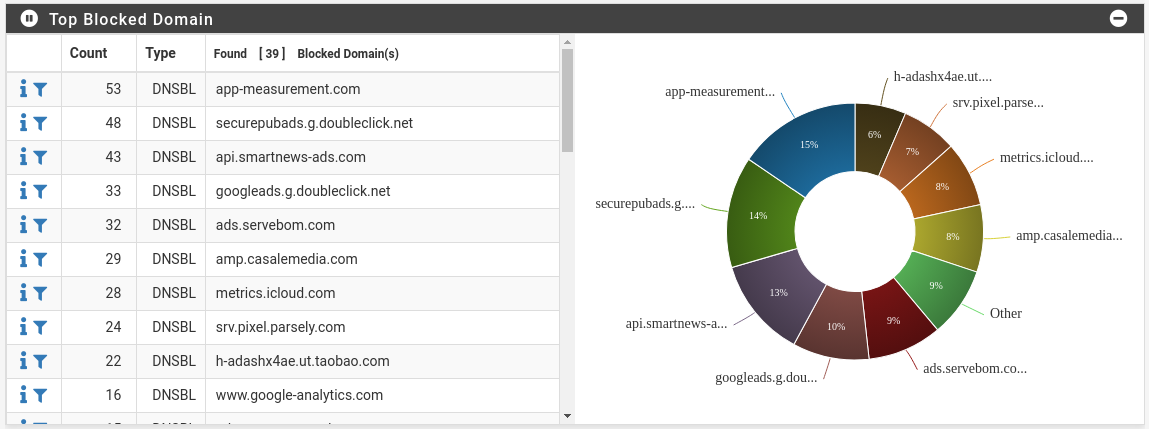
The pie chart looks great. I followed this pfBlockerNG tutorial.
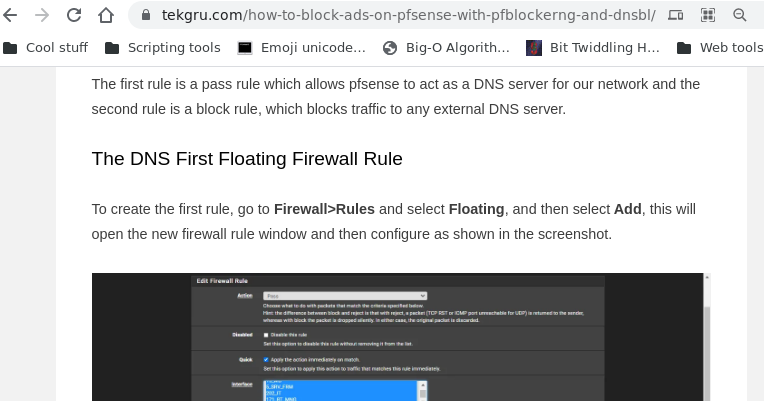
This is mportant: If you have multiple network interfaces (the mini PC has four), then you need to enable the Permit Firewall Rules for multiple interfaces and select them.

Would you like to have discretion over blocklists? Let’s add a DNS blocklist related to gambling and reload pfBlockerNG to see if a poker site is blocked on the Trusted LAN.
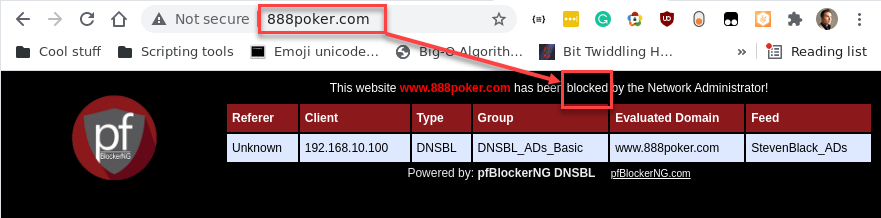
If you would prefer the connection to just close instead of rendering a PHP page, create a new PHP script with the following code and select it in the pfBlockerNG settings page:
|
# nano /usr/local/www/pfblockerng/www/killed.php igno |