


12 minutes read
In this article we will learn how to deploy Keycloak with PostgreSQL on Kubernetes. We will first do everything manually with separate YAMLs and then later with Helm. Our k8s environment will run in Kind, which is an easy to use k8s variant for local expermentation. The sources are located here.
Keycloak
Keycloak is one of the most popular open-source Identity and Access Management providers. It can run in various environments, from small shops up to giant data centers. Although this article isn’t about IAM’s in general and how to use them, let’s provide a simple definition just to make sure we’re all on the same page.
An IAM is needed when there is a need to define and regulate identities and access rights within an organization. That is, when there are different parties with different interests and certain resources that should or shouldn’t be used by certain parties in certain ways. And to regulate this is almost always a really complex task, because you need a mechanism that defines groups, roles, memberships, access rights, authorization flows, and so on. But you also need a mechanism that can delegate access rights based on user rights. For example, you want to be able to allow a mobile app to access some data on a resource that you can already access directly. As the app in question isn’t you personally, you’d like to somehow “delegate” your access rights to it, so that it can work with your data on your behalf.
Simply spoken: in situations like these you have to deal with problems related to authentication (who you are), access rights (what you can do), and authorization (what can be done in your name). These questions are the reason why Keycloak and similar systems exist. They offer us an easy to use graphical interface where we can configure everything that’s needed to provide secure access to resources. But not only this. You can also extend Keycloak to match your individual security settings. By writing extensions you can inject pieces of logic into Keycloak that will be executed each time a certain security feature is accessed. But we won’t cover writing extensions here, so I’ll leave it for a potential future article. 😉
Our Keycloak instance will be running in k8s and will be using a PostgreSQL database which will run in k8s as well. This is not mandatory as we could also provide a DB that is running outside of k8s, but here I wanted to show how we can use PersistentVolumes and PersistentVolumeClaims to create durable storage solutions. But before we run any script in that direction, we need a proper k8s environment first. Here we will be using Kind.
Kind
Kind is one of the popular “local kubernetes” environments. You might have heard about minikube, k3s, k3d and similar solutions as well. Kind runs inside Docker and therefore we must have it installed and running before we fire up Kind. The easiest way is just to install Docker Desktop for your OS.
Depending on your OS you will use one of the options described in the official Kind docs. After the installation we will setup a new cluster that will run our Keycloak environment. Unless you have a specific requirements I’d recommend to use the config.yml from the “kind” subdirectory in the github repo. Also take into account that this config.yml contains patches needed to make the deployment accessible from outside. Please read the official docs from Kind.
kind create cluster hbr-cluster --config=config.yml
kubectl cluster-info --context kind-hbr-cluster

If you see an output like the one shown above then everything was successful so far. The last step is the installation of an IngressController, in this case it will be NGINX-Ingress.
kubectl apply -f https://raw.githubusercontent.com/kubernetes/ingress-nginx/main/deploy/static/provider/kind/deploy.yaml
Further info on the general usage of Ingresses can be found in Kind’s docs as well. But for now, we’re all set and can start with our manual deployment.
Manual deployments with YAML
In professional k8s environments you will be mostly using tools like Helm, Kustomize and similar to deploy and configure deployments. However, for local demos or learning purposes the manual application of YAMLs files is still recommended. Kubernetes is complex and it is therefore recommended to learn a few basics first. There are a plenty of very good docs out there and the official one is going into great lengths to explain every aspect of k8s. You should definitely read it on a daily basis. I prefer to enter some term that interests me and then let the official docs guide me through various options.
Out setup contains the following components that will be configured with their respective YAMLs:
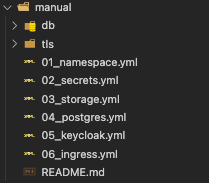
This is how the YAMLs look like in the folder structure:
Namespaces
As we want to keep these parts of our system grouped together we create a new Namespace first.
kubectl apply -f 01_namespace.yml
Secrets
We will define several Secrets to maintain passwords and certficates that are needed to access our database, admin console of Keycloak, and deliver TLS certificates via Ingress. For this we apply the second YAML in a row:
kubectl apply -f 02_secrets.yml
Storage
Our Postgres instance will save its data somewhere in the k8s cluster. And because k8s treats everything as ephemeral (that is, forgettable in a millisecond) we want our data to be persistent so that it remains even after a deployment got destroyed or recreated. For this task we will use two new k8s classes: the physical storage itself, PersistentVolume, and a request of a piece of storage, PersistentVolumeClaim. Just like a Pod requests a piece of a Node’s resources the Pe