


Chromebooks are a ubiquitous staple mostly in educational spaces. They are small, cheap, and efficient laptops usually given out to students to do their work. Made by Google, the entire OS mainly acts as a web browser to access Google’s cloud resources (Google docs, sheets, etc).
What happens to the thousands of Chromebooks in schools after a few years pass? They end up in an end-of-life (EOL) state, unable to receive updates from Google. Laptops from 2018 are thrown away, scrapped, or auctioned off because they no longer will work. Is it because the hardware is broken or obsolete? No. It’s because Google wants to increase sales, and so after a few years they intentionally strand thousands of machines.
The history of the Chromebook is a history of planned obsolescence, a perfect example of how computing operates within capitalism – to maximize profit at the expense of all else. These complex machines are meant to be thrown away, tossed aside, and scraped. The rare earth minerals, the labor involved typically in the global south being carried out by an exploited labor force, the resources used to transport these materials, and the fossil fuels used in their mining, transport, development, and manufacturing. All of these resources and work are discarded. These computers could become free computers for low-income families or people who just need a new computer to do work in our ever-evolving digital world. But instead, they go to waste.
This article is broken up into two parts. The first is an actual tutorial on how to make a Chromebook boot to an up to date Linux install.
The other part of this article will go into the reasonings behind this, and talk more about planned obsolecnece, computers, capitalism, permacomputing, and post-scarcity anti-capitalist futures.
Click here to skip to that section.
This tutorial will be specifically for installing Ubuntu onto an external drive, and being able to tinker with a Chromebook to allow it to boot to that drive while maintaining the original ChromeOS. There are many factors and reasons why I went this route, and some considerations to keep in mind.
While this project is for a specific purpose, keep in mind that you don’t have to go this route. Do whatever you want, modify things to how you want them to be.
So why did I choose to boot to an external drive while keeping the original ChromeOS?
-
These machines are going to be used to help build an autonomous wireless community network. This network will be not only for normal times, but also for emergencies. With that being said, not everyone will be familiar with or able to operate a Linux install, let alone be a server admin. So I want to maintain the ability for a nontechnical person to pick one of these up and just use it as a client. Keeping the ChromeOS on there allows for someone to just quickly use the machine. This allows them to be more versatile.
-
The onboard memory is small, the models I got my hands on have 16GB of onboard eMMC storage. That is basically nothing. You could overwrite the ChromeOS with something like Ubuntu or Linux Mint, but then you have to do some annoying disk partitioning to separate the home directory, and either way you will need an external disk to use these as a server anyways. So it’s easier to just install it all on a USB drive or external hard drive.
-
“But why not use other regular (non Chromebook) laptops?” You should try and reuse any and all computers you can. I’m not saying that Chromebooks should replace using an old laptop. Other laptops are actually easier to use because they have actual BIOS installed, and you can usually just replace the internal hard drive. What I’m saying here is not to overlook Chromebooks for their potential to do the same thing. They require slightly more work but it’s better than then ending up in a landfill. This is not to say that Chromebooks are better in any way either. This is a tutorial to help people save EOL Chromebooks, not to discount you on reusing an old Thinkpad.
-
Using an external drive to boot and use as your main drive means that you can take the USB/drive out and use it on really any computer. So it gives you more versatility. In an emergency situation, imagine if you had one of these Chromebooks and the screen gets damaged. Well, just take your drive and plug it into any other computer, and boot to it. This gives you more options when it comes to use, especially because the storage on a Chromebook is soldered-on, you don’t have an easy way to remove data from the soldered-on drive.
-
Raspberry Pi’s are expensive and overrated. The original platform I was using to make these networks was a Raspberry Pi, but if you haven’t looked at the prices of them after Covid, they are crazy expensive. There are plenty of nerds with a ton of them gathering dust from old projects. But to expect other people to have one already or even source one is ridiculous. Most of the clones are also expensive. You can get a used Chromebook (or an entire pallet of them) for less than $30. Chromebooks are also more powerful and have a screen, keyboard, and battery for even less than a barebones Raspberry Pi. There is a place for them if you need access to GPIO pins. One upside to a Pi is power consumption, but again, that depends on how you are powering them. Since Chromebooks are pretty efficient, they are good on battery life. The same way you would more than likely charge a battery bank is how you would recharge a Chromebook.
Overall, we want to create a resilient system here. Making things modular, portable and able to adapt to situations. If you install everything on a machine with a soldered-on drive, it will be hard to get information off that drive compared to installing it to an external source. With this you can both have a drive that can work on any computer, but also have a Chromebook that can double as a server when someone is there to manage it, but also can default back to just an internet client that anyone can pick up and use.
There are a couple of points I want to illustrate so you can know if you can know things ahead of time. There are some positives and negatives and some weird small stuff but it’s easy and small enough to make reviving Chromebooks possible.
-
Making a bootable Linux USB/drive means you can plug that drive into any other computer and start rockin’. In an emergency situation this mean that you can quickly switch to other machines if needed and keep things running.
-
This is way cheaper than a Raspberry Pi if you are not needing GPIO pins. To make an actual portable Raspberry Pi requires so much that is already built into the Chromebook.
Chromebooks are built to run ChromeOS, and with that comes some small annoying things about dual booting. When the computer is first started you will always need to wait 30 seconds after a stupid splash page, or press Ctl+D to boot to ChromeOS or Ctl+L to boot to an external drive.
-
There are some steps you have to take to get the Chromebook to even boot to a USB. This might mean opening up the laptop and removing a screw. The alternative though is worse – these devices ending up in e-waste landfills or being scrapped with chemical and polluting processes.
-
First, you will need a Chromebook (I will go over sourcing later on)
-
A USB drive to flash the Ubuntu installer (or any linux flavor)
-
A USB drive to install the OS on or an external drive.
-
Might need a screwdriver depending on your model.
This tutorial is based on another tutorial by Fascinating Captain, but I ran into some issues and nuances that aren’t mentioned in his original article. There are also multiple other paths to take depending on your Chromebook model, and the models I have fall into that.
-
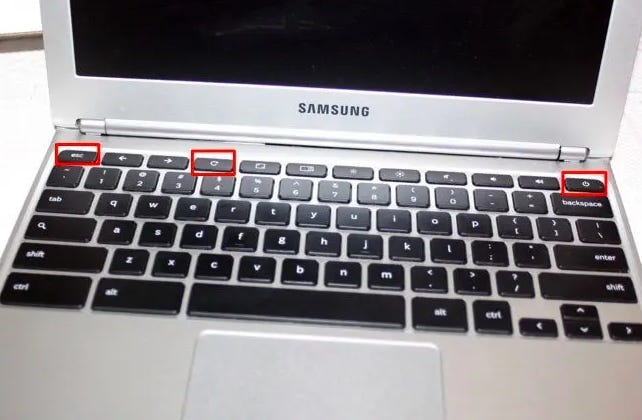
Enter developer mode by turning off the machine, then holding the ESC + Refresh buttons while pressing the power button.
-
Press Ctl+D and then Enter.
-
Login or enter a guest session.
-
Open Chrome and then Ctrl + Alt + T to open a terminal.
-
Then type shell to open a bash shell.
-
cd /usr/local
-
sudo curl -LO mrchromebox.tech/firmware-util.sh && sudo bash firmware-util.sh
-
See if “Install/Update RW_LEGACY Firmware” is blue. If not and [WP] is on every line, you can’t use software to remove the write protection and need to remove the WP screw.
-
(If needed) remove the WP screw.
-
Rerun the original script, if “Install/Update RW_LEGACY Firmware” is not blue skip to running: bash <(curl https://johnlewis.ie/flash_cb_fw.sh)
-
Either way, the firmware will be installed.
-
Reboot then enter a terminal with Ctrl + Alt + T or Ctrl+Alt+F2 (the back button) then enter this command in the terminal: sudo crossystem dev_boot_usb=1 dev_boot_legacy=1
-
Some models may require this command to be run instead, it will tell you. Run: sudo crossystem dev_boot_usb=1 dev_boot_altfw=1
-
Create bootable Linux installer USB.
-
Reboot the machine and when at the “OS Verification is OFF” page press Ctl+L with the boot USB in then press ESC to list the drives and boot to it.
-
Install Linux to another external USB or external drive.
-
Reboot and press Ctl+L to boot to the external drive or Ctl+D to boot to Chrome OS
Entering developer mode will erase everything on the Chromebook. More than likely it’s already empty, but if you have been using it already backup your data off the machine because it will be wiped.
-
With your Chromebook turned off hold down the ESC and Refresh While keeping them held down, press the power button once. You may need to hold the power button for a couple of seconds depending on your model.
-
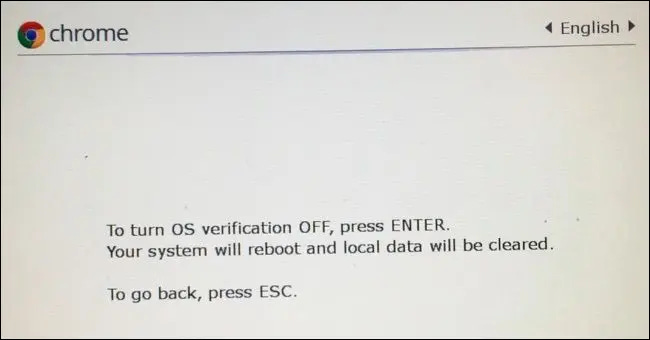
The next screen will look scary and say “Chrome OS is missing or damaged.” that isn’t true. Press Ctrl+D to bypass this screen.
-
Turn off OS verification on the next page by pressing “Enter”
-
The Chromebook will reboot after that.
-
On the OS verification is OFF screen press Ctrl+D to bypass this message.
-
You will see a timer counting down in the top right hand corner of the screen. It may also boot to a black screen that spins and says “Preparing the system for development mode”. Just wait until this finishes. The Chromebook will reboot and you’ll see the screen with the red exclamation mark.
-
Developer mode is now enabled! To boot into ChromeOS, press Ctrl+D. Don’t press enter because that will enable OS verification which you don’t want.
After that, it will take you to a Chromebook page, press “Get Started” and connect to a Wifi network.
After accepting Googles BS terms and conditions, there will be an option to setup the Chromebook with an account. You can do this if you want, but keep in mind if you are using an old Chromebook you more than likely won’t be covered by security patches so keep that in mind.
Guest mode can be found at the bottom of that screen when you are first setting up the Chromebook. You can activate everything through a guest session, just be aware that your history won’t be saved.
Next we will open a shell to get the firmware installed.